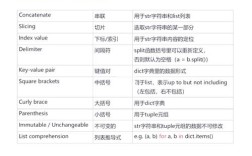
Of course! The combination of Puppet, Python, and Django is a powerful and common stack for automating the deployment and management of modern web applications. Here’s a comprehensive breakdown of how they fit together, from the foundational concepts to a practical example.
The High-Level Overview: Who Does What?
Think of it as a team with distinct roles:

- Puppet (The Infrastructure & Operations Manager): Puppet's job is to define and enforce the "desired state" of your servers. It doesn't deploy your application code directly. Instead, it sets up the environment in which your Django application will run. It ensures that every server is configured consistently and correctly, every time.
- Python (The Programming Language): This is the language your Django application is written in. Puppet's job is to install a specific version of Python and its package manager,
pip, on the server. - Django (The Web Application Framework): This is the actual application you are building. Puppet's job is to install Django and all its dependencies (via
pip) and then configure a web server (like Nginx or Apache) to serve your Django application.
How Puppet Manages a Django Application: A Step-by-Step Breakdown
Let's walk through the lifecycle of a Django server managed by Puppet.
Server Provisioning and Base Configuration
Before your Django app can run, the server needs a basic, consistent setup. Puppet handles this with a "manifest" (a Puppet configuration file).
Example: base.pp Manifest
This manifest would be applied to all your servers (web servers, database servers, etc.) to ensure they have a common baseline.

# base.pp
class base {
  # Ensure the timezone is set correctly (important for logs and scheduling)
  class { 'timezone':
    timezone => 'UTC',
  }
  # Manage the firewall, opening only necessary ports
  firewall { '100 allow http and https':
    port   => [80, 443],
    proto  => 'tcp',
    action => 'accept',
  }
  # Install common, useful packages
  package { ['htop', 'curl', 'wget']:
    ensure => present,
  }
}
Installing Python and the Django Environment
This is the core of the Puppet-Python-Django interaction. Puppet will use its modules to install Python, pip, and then use pip to install Django and other Python packages.
Example: webserver.pp Manifest
This manifest is specific to the server that will run your Django application.
# webserver.pp
class { '::base': } # Inherit the base configuration
# Use a community Puppet module for Python management
# A popular one is 'puppet-python'
class { 'python':
    version        => '3.9', # Specify the Python version you need
    pip           => true,  # Ensure pip is installed
    dev           => true,  # Install development headers (needed for some packages)
    virtualenv    => true,  # Install virtualenv
}
# Install Django and other Python dependencies for your app
# This is the key step where Puppet calls 'pip install'
python::pip { 'django':
    ensure    => '4.1.7', # Pin to a specific version for reproducibility
    owner     => 'root',
    group     => 'root',
    virtualenv => '/opt/myapp/venv', # Install into a virtualenv (best practice)
}
python::pip { 'gunicorn':
    ensure    => '21.2.0',
    owner     => 'root',
    group     => 'root',
    virtualenv => '/opt/myapp/venv',
}
python::pip { 'psycopg2-binary': # Example for a PostgreSQL database driver
    ensure    => '2.9.3',
    owner     => 'root',
    group     => 'root',
    virtualenv => '/opt/myapp/venv',
}
Key Concepts in this Step:

- Module Reuse: We use the
puppet-pythonmodule, which is a pre-built set of Puppet resources for managing Python. You don't have to write the raw shell commands (apt-get install python3.9,pip3 install django). - Idempotency: If you run this manifest on a server that already has Django 4.1.7 installed, Puppet will do nothing. If you run it again, it will still do nothing. If you change the version to
2.0, Puppet will runpip install --upgrade djangoto bring it to the desired state. This is a core principle of configuration management. - Virtualenv: Installing packages into a virtualenv is a best practice that isolates your application's dependencies from the system's Python.
Deploying the Application Code
Puppet can also manage your application code itself. This is typically done by pulling the code from a Git repository.
# In webserver.pp
# Create a directory for our app
file { '/opt/myapp':
    ensure => directory,
    owner  => 'www-data', # User the web server runs as
    group  => 'www-data',
}
# Deploy the application code from a Git repository
# Requires the 'puppetlabs-vcsrepo' module
vcsrepo { '/opt/myapp/source':
    ensure   => present,
    provider => git,
    source   => 'https://github.com/your-username/your-django-app.git',
    revision => 'main', # Or a specific commit/tag
    require  => File['/opt/myapp'],
}
# Install dependencies from a requirements file
python::pip::install { '/opt/myapp/source/requirements.txt':
    virtualenv => '/opt/myapp/venv',
    require   => Vcsrepo['/opt/myapp/source'], # Only run after code is pulled
}
Configuring the Web Server (Nginx/Apache)
Your Django app doesn't talk directly to the internet. It sits behind a reverse proxy like Nginx, which serves static files and forwards dynamic requests to the Django application server (Gunicorn, uWSGI).
Puppet will manage the Nginx configuration file.
# In webserver.pp
# Install Nginx
class { 'nginx': }
# Create a virtual host configuration for our app
file { '/etc/nginx/sites-available/myapp':
    ensure  => file,
    content => template('myapp/nginx.conf.erb'), # Use a template for dynamic content
    notify  => Service['nginx'], # Restart Nginx when this file changes
}
# Enable the site by creating a symlink
file { '/etc/nginx/sites-enabled/myapp':
    ensure  => link,
    target  => '/etc/nginx/sites-available/myapp',
    require => File['/etc/nginx/sites-available/myapp'],
    notify  => Service['nginx'],
}
Example nginx.conf.erb Template:
This template allows you to insert dynamic values (like the server's IP or the path to your app) into the Nginx config.
# /etc/puppet/modules/myapp/templates/nginx.conf.erb
server {
    listen 80;
    server_name <%= @server_name %>;
    location /static/ {
        root /opt/myapp/source; # Serve static files directly from Nginx
    }
    location / {
        proxy_pass http://127.0.0.1:8000; # Forward to Gunicorn
        proxy_set_header Host $host;
        proxy_set_header X-Real-IP $remote_addr;
    }
}
Managing the Application Service (Gunicorn)
Finally, you need to ensure that Gunicorn (the Python WSGI server that runs Django) is always running. Puppet can manage this as a systemd service.
# In webserver.pp
# Create a systemd service file for Gunicorn
file { '/etc/systemd/system/gunicorn.service':
    ensure  => file,
    content => template('myapp/gunicorn.service.erb'),
    notify  => Exec['daemon-reload'],
}
# Reload systemd to pick up the new service
exec { 'daemon-reload':
    command     => '/bin/systemctl daemon-reload',
    refreshonly => true,
    notify      => Service['gunicorn'],
}
# Ensure the Gunicorn service is running and enabled to start on boot
service { 'gunicorn':
    ensure  => running,
    enable  => true,
    require => File['/etc/systemd/system/gunicorn.service'],
}
Example gunicorn.service.erb Template:
# /etc/puppet/modules/myapp/templates/gunicorn.service.erb
[Unit]
Description=gunicorn daemon
After=network.target
[Service]
User=www-data
Group=www-data
WorkingDirectory=/opt/myapp/source
ExecStart=/opt/myapp/venv/bin/gunicorn \
          --workers 3 \
          --bind unix:/run/gunicorn.sock \
          myproject.wsgi:application
[Install]
WantedBy=multi-user.target
The Workflow: From Local Dev to Production
- Develop Locally: You write Django code on your local machine.
- Commit to Git: You commit your code and any changes to
requirements.txtto a Git repository.