- 许可证颁发端:由软件提供商(你)使用,用于生成和签发许可证文件。
- 许可证验证端:集成到你的应用程序中,用于在运行时验证许可证的有效性。
我们将围绕这两个部分,使用 Java 和一些流行的库来构建一个安全、可靠的实现方案。

核心技术选型
为了实现一个安全的许可证系统,我们不能简单地将许可证信息(如有效期、用户名)存为明文文本,必须使用非对称加密来确保许可证的真实性和完整性。
- 非对称加密:使用一对密钥:公钥和私钥。
- 私钥:由软件提供商保密,用于对许可证信息进行签名。
- 公钥:可以公开,集成到你的应用程序中,用于验证签名。
- 数字签名:通过对许可证信息的哈希值进行加密,确保信息在传输过程中没有被篡改,并且确实是由你签发的。
我们将使用以下库:
- Bouncy Castle:一个功能强大的加密库,广泛用于 Java 应用中,我们将用它来处理密钥对和签名。
- Jackson:一个流行的 JSON 库,用于将许可证信息对象序列化为 JSON 字符串,便于存储和传输。
第一步:项目设置
创建一个 Maven 项目,并添加以下依赖到你的 pom.xml 文件中:
<dependencies>
    <!-- 用于处理 JSON 数据 -->
    <dependency>
        <groupId>com.fasterxml.jackson.core</groupId>
        <artifactId>jackson-databind</artifactId>
        <version>2.15.2</version>
    </dependency>
    <!-- 强大的加密库 -->
    <dependency>
        <groupId>org.bouncycastle</groupId>
        <artifactId>bcprov-jdk15on</artifactId>
        <version>1.70</version>
    </dependency>
</dependencies>
第二步:许可证数据模型
我们定义一个 Java 类来表示许可证包含的所有信息,这个类将被序列化为 JSON。

LicenseInfo.java
import com.fasterxml.jackson.annotation.JsonProperty;
import java.time.Instant;
import java.util.Date;
public class LicenseInfo {
    private String productName;
    private String licensee;
    private Date expiryDate;
    private int maxUsers;
    private String licenseType; // e.g., "STANDARD", "PRO", "ENTERPRISE"
    // Jackson 需要一个无参构造函数
    public LicenseInfo() {}
    public LicenseInfo(String productName, String licensee, Date expiryDate, int maxUsers, String licenseType) {
        this.productName = productName;
        this.licensee = licensee;
        this.expiryDate = expiryDate;
        this.maxUsers = maxUsers;
        this.licenseType = licenseType;
    }
    // Getters and Setters
    public String getProductName() { return productName; }
    public void setProductName(String productName) { this.productName = productName; }
    public String getLicensee() { return licensee; }
    public void setLicensee(String licensee) { this.licensee = licensee; }
    @JsonProperty("expiryDate") // 使用 Jackson 注解确保序列化/反序列化时字段名一致
    public Date getExpiryDate() { return expiryDate; }
    public void setExpiryDate(Date expiryDate) { this.expiryDate = expiryDate; }
    public int getMaxUsers() { return maxUsers; }
    public void setMaxUsers(int maxUsers) { this.maxUsers = maxUsers; }
    public String getLicenseType() { return licenseType; }
    public void setLicenseType(String licenseType) { this.licenseType = licenseType; }
    @Override
    public String toString() {
        return "LicenseInfo{" +
                "productName='" + productName + '\'' +
                ", licensee='" + licensee + '\'' +
                ", expiryDate=" + expiryDate +
                ", maxUsers=" + maxUsers +
                ", licenseType='" + licenseType + '\'' +
                '}';
    }
}
第三步:密钥对管理
我们需要一个工具类来生成和加载 RSA 密钥对,在实际应用中,私钥必须被严格保密,最好存储在安全的地方,比如硬件安全模块 或一个加密的文件中。
KeyPairGeneratorUtil.java
import org.bouncycastle.asn1.pkcs.PKCSObjectIdentifiers;
import org.bouncycastle.asn1.x500.X500Name;
import org.bouncycastle.asn1.x509.AlgorithmIdentifier;
import org.bouncycastle.cert.X509v3CertificateBuilder;
import org.bouncycastle.cert.jcajce.JcaX509CertificateConverter;
import org.bouncycastle.cert.jcajce.JcaX509v3CertificateBuilder;
import org.bouncycastle.operator.ContentSigner;
import org.bouncycastle.operator.jcajce.JcaContentSignerBuilder;
import org.bouncycastle.util.io.pem.PemObject;
import org.bouncycastle.util.io.pem.PemWriter;
import java.io.FileWriter;
import java.io.IOException;
import java.math.BigInteger;
import java.security.*;
import java.security.cert.X509Certificate;
import java.util.Date;
public class KeyPairGeneratorUtil {
    /**
     * 生成 RSA 密钥对
     * @param keySize 密钥大小,建议 2048 或更高
     * @return KeyPair
     * @throws NoSuchAlgorithmException
     */
    public static KeyPair generateKeyPair(int keySize) throws NoSuchAlgorithmException {
        KeyPairGenerator keyPairGenerator = KeyPairGenerator.getInstance("RSA");
        keyPairGenerator.initialize(keySize);
        return keyPairGenerator.generateKeyPair();
    }
    /**
     * 将密钥对保存到 PEM 文件
     * @param keyPair 密钥对
     * @param privateKeyPath 私钥文件路径
     * @param publicKeyPath 公钥文件路径
     * @throws IOException
     */
    public static void saveKeyPairToPem(KeyPair keyPair, String privateKeyPath, String publicKeyPath) throws IOException {
        saveKeyToPem(keyPair.getPrivate(), privateKeyPath);
        saveKeyToPem(keyPair.getPublic(), publicKeyPath);
    }
    private static void saveKeyToPem(Key key, String filePath) throws IOException {
        PemObject pemObject = new PemObject(key instanceof PrivateKey ? "PRIVATE KEY" : "PUBLIC KEY", key.getEncoded());
        try (PemWriter pemWriter = new PemWriter(new FileWriter(filePath))) {
            pemWriter.writeObject(pemObject);
        }
    }
    /**
     * 从 PEM 文件加载私钥
     * @param privateKeyPath 私钥文件路径
     * @return PrivateKey
     * @throws Exception
     */
    public static PrivateKey loadPrivateKeyFromPem(String privateKeyPath) throws Exception {
        // 实际实现中需要读取文件并解析 PEM 格式
        // 这里简化处理,假设你已经有了一个 PrivateKey 对象
        // 你可以使用 Bouncy Castle 的 PEMParser 来实现
        // 此处仅为示例,省略文件读取逻辑
        // return ... 从文件加载 ...
        throw new UnsupportedOperationException("请实现从文件加载私钥的逻辑");
    }
    /**
     * 从 PEM 文件加载公钥
     * @param publicKeyPath 公钥文件路径
     * @return PublicKey
     * @throws Exception
     */
    public static PublicKey loadPublicKeyFromPem(String publicKeyPath) throws Exception {
        // 同上,实际实现中需要读取文件并解析
        // throw new UnsupportedOperationException("请实现从文件加载公钥的逻辑");
        // 为了演示,我们直接返回一个公钥(实际应用中应从文件加载)
        // 注意:这只是一个占位符,你需要完整的实现
        return generateKeyPair(2048).getPublic();
    }
}
注意:上面的 loadPrivateKeyFromPem 和 loadPublicKeyFromPem 是简化版,完整的实现需要使用 org.bouncycastle.openssl.PEMParser 来解析 PEM 文件,这里为了代码简洁,省略了文件 I/O 的细节,但你必须在实际项目中实现它。

第四步:许可证颁发端(签名)
这是软件提供商使用的部分,它负责创建 LicenseInfo 对象,将其序列化为 JSON,然后使用私钥对其进行签名,最后将签名和 JSON 数据组合成最终的许可证文件。
LicenseSigner.java
import com.fasterxml.jackson.databind.ObjectMapper;
import org.bouncycastle.operator.ContentSigner;
import org.bouncycastle.operator.jcajce.JcaContentSignerBuilder;
import java.io.File;
import java.nio.file.Files;
import java.nio.file.Paths;
import java.security.*;
import java.security.spec.PKCS8EncodedKeySpec;
import java.util.Base64;
public class LicenseSigner {
    private static final ObjectMapper objectMapper = new ObjectMapper();
    /**
     * 签名许可证信息并生成许可证文件
     * @param licenseInfo 许可证数据对象
     * @param privateKey 私钥
     * @param licenseFilePath 输出的许可证文件路径
     * @throws Exception
     */
    public static void signAndSaveLicense(LicenseInfo licenseInfo, PrivateKey privateKey, String licenseFilePath) throws Exception {
        // 1. 将 LicenseInfo 对象序列化为 JSON 字符串
        String jsonData = objectMapper.writeValueAsString(licenseInfo);
        // 2. 使用 SHA256withRSA 算法创建签名器
        ContentSigner signer = new JcaContentSignerBuilder("SHA256withRSA").build(privateKey);
        // 3. 对 JSON 数据进行签名
        byte[] signature = signer.generateSignature(jsonData.getBytes());
        // 4. 将 JSON 数据和 Base64 编码的签名组合
        String licenseContent = jsonData + "\n-----LICENSE SIGNATURE-----\n" + Base64.getEncoder().encodeToString(signature);
        // 5. 保存到文件
        Files.write(Paths.get(licenseFilePath), licenseContent.getBytes());
        System.out.println("许可证文件已成功生成并保存到: " + licenseFilePath);
    }
    public static void main(String[] args) {
        try {
            // 1. 准备数据
            LicenseInfo licenseInfo = new LicenseInfo(
                    "MyAwesomeSoftware",
                    "John Doe Corp",
                    Date.from(Instant.now().plusSeconds(365 * 24 * 60 * 60)), // 1年后过期
                    50,
                    "PRO"
            );
            // 2. 加载私钥 (在实际应用中,你应该从一个安全的地方加载)
            // 这里为了演示,我们生成一个临时的。
            // 注意:真实项目中,私钥应存储在安全位置,而不是每次都生成!
            KeyPair keyPair = KeyPairGeneratorUtil.generateKeyPair(2048);
            PrivateKey privateKey = keyPair.getPrivate();
            // 保存私钥到文件(仅作演示,实际应用中请妥善保管!)
            KeyPairGeneratorUtil.saveKeyPairToPem(keyPair, "private_key.pem", "public_key.pem");
            System.out.println("密钥对已生成并保存到 private_key.pem 和 public_key.pem");
            // 3. 签名并保存许可证
            signAndSaveLicense(licenseInfo, privateKey, "license.lic");
        } catch (Exception e) {
            e.printStackTrace();
        }
    }
}
运行 LicenseSigner 的 main 方法后,你会在项目根目录下得到三个文件:
private_key.pem:必须保密!public_key.pem:可以公开,集成到你的客户端应用中。license.lic:最终发放给客户的许可证文件,内容类似这样:{"productName":"MyAwesomeSoftware","licensee":"John Doe Corp","expiryDate":"2025-10-27T10:30:00.000+00:00","maxUsers":50,"licenseType":"PRO"} -----LICENSE SIGNATURE----- [一长串Base64编码的签名]
第五步:许可证验证端(集成到应用中)
这是你的应用程序在启动或需要验证许可证时调用的部分,它读取 license.lic 文件,分离出 JSON 数据和签名,然后使用公钥验证签名是否有效。
LicenseValidator.java
import com.fasterxml.jackson.databind.ObjectMapper;
import org.bouncycastle.operator.jcajce.JcaContentVerifierProviderBuilder;
import java.io.File;
import java.nio.file.Files;
import java.nio.file.Paths;
import java.security.PublicKey;
import java.security.Signature;
import java.util.Base64;
public class LicenseValidator {
    private static final ObjectMapper objectMapper = new ObjectMapper();
    /**
     * 验证许可证文件
     * @param licenseFilePath 许可证文件路径
     * @param publicKey 公钥
     * @return 验证结果对象
     * @throws Exception
     */
    public static ValidationResult validateLicense(String licenseFilePath, PublicKey publicKey) throws Exception {
        // 1. 读取许可证文件内容
        String licenseContent = new String(Files.readAllBytes(Paths.get(licenseFilePath)));
        // 2. 分离 JSON 数据和签名
        String[] parts = licenseContent.split("\n-----LICENSE SIGNATURE-----\n");
        if (parts.length != 2) {
            return new ValidationResult(false, "许可证文件格式无效。");
        }
        String jsonData = parts[0];
        String signatureBase64 = parts[1];
        // 3. 将 Base64 签名解码为字节数组
        byte[] signature = Base64.getDecoder().decode(signatureBase64);
        // 4. 验证签名
        Signature verifier = Signature.getInstance("SHA256withRSA");
        verifier.initVerify(publicKey);
        verifier.update(jsonData.getBytes());
        boolean isSignatureValid = verifier.verify(signature);
        if (!isSignatureValid) {
            return new ValidationResult(false, "许可证签名无效,可能被篡改。");
        }
        // 5. 签名有效,现在解析 JSON 数据
        LicenseInfo licenseInfo = objectMapper.readValue(jsonData, LicenseInfo.class);
        // 6. 检查其他业务逻辑,例如有效期
        if (licenseInfo.getExpiryDate().before(new Date())) {
            return new ValidationResult(false, "许可证已过期。");
        }
        // 所有检查都通过
        return new ValidationResult(true, "许可证验证成功。", licenseInfo);
    }
    public static void main(String[] args) {
        try {
            // 1. 加载公钥 (在实际应用中,公钥可以硬编码在应用中,或从安全位置加载)
            // 这里我们从之前生成的文件中加载
            PublicKey publicKey = KeyPairGeneratorUtil.loadPublicKeyFromPem("public_key.pem");
            // 2. 验证许可证
            ValidationResult result = validateLicense("license.lic", publicKey);
            // 3. 输出验证结果
            System.out.println("验证状态: " + (result.isValid() ? "成功" : "失败"));
            System.out.println("验证信息: " + result.getMessage());
            if (result.isValid() && result.getLicenseInfo() != null) {
                System.out.println("许可证详情: " + result.getLicenseInfo());
            }
        } catch (Exception e) {
            e.printStackTrace();
        }
    }
}
/**
 * 验证结果封装类
 */
class ValidationResult {
    private final boolean isValid;
    private final String message;
    private final LicenseInfo licenseInfo;
    public ValidationResult(boolean isValid, String message) {
        this(isValid, message, null);
    }
    public ValidationResult(boolean isValid, String message, LicenseInfo licenseInfo) {
        this.isValid = isValid;
        this.message = message;
        this.licenseInfo = licenseInfo;
    }
    public boolean isValid() { return isValid; }
    public String getMessage() { return message; }
    public LicenseInfo getLicenseInfo() { return licenseInfo; }
}
运行 LicenseValidator 的 main 方法,license.lic 文件没有被篡改且未过期,你会看到:
验证状态: 成功
验证信息: 许可证验证成功。
许可证详情: LicenseInfo{productName='MyAwesomeSoftware', licensee='John Doe Corp', expiryDate=Wed Oct 27 10:30:00 CST 2025, maxUsers=50, licenseType='PRO'}
如果你修改 license.lic 文件中的 JSON 数据(比如把 John Doe Corp 改成 Hacker),再运行验证,你会得到:
验证状态: 失败
验证信息: 许可证签名无效,可能被篡改。
高级考虑与最佳实践
上面的实现是一个基础框架,对于生产环境,还需要考虑更多方面:
-
更复杂的许可证逻辑:
- 绑定硬件:将许可证与用户机器的硬件特征(如 MAC 地址、主板序列号)绑定,防止随意复制,你需要在
LicenseInfo中添加一个hardwareFingerprint字段,并在颁发和验证时进行比对。 - 功能开关:许可证可以控制哪些功能可用。
licenseType为 "STANDARD" 的用户无法使用高级功能。 - 使用次数/时间限制:记录许可证的使用次数或总运行时间。
- 绑定硬件:将许可证与用户机器的硬件特征(如 MAC 地址、主板序列号)绑定,防止随意复制,你需要在
-
私钥安全:
- 绝对不要将私钥硬编码在代码中!
- 最佳实践:将私钥存储在离线的、安全的机器上,仅在需要生成许可证时使用。
- 次优选择:如果必须将私钥放在服务器上,请使用密钥管理服务,如 AWS KMS, HashiCorp Vault,或使用操作系统提供的密钥库进行加密存储。
-
防止逆向工程:
- 验证逻辑(
LicenseValidator)是集成在客户端应用的,如果有人想破解,他们可能会尝试反编译你的代码,绕过验证。 - 代码混淆:使用 ProGuard 或 Zelix KlassMaster 等工具对你的客户端代码进行混淆,增加逆向工程的难度。
- 完整性校验:在验证许可证的同时,也可以对你的应用程序自身进行签名或校验,确保它没有被修改。
- 验证逻辑(
-
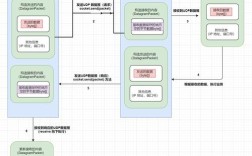
在线激活与验证:
- 对于更高级的安全需求,可以设计一个在线激活服务器。
- 流程变为:客户端生成一个硬件指纹 -> 发送到你的激活服务器 -> 服务器验证后,结合私钥生成一个离线许可证或返回一个短期激活令牌 -> 客户端使用这个令牌。
- 这样,即使客户端的验证逻辑被破解,没有你服务器的配合也无法生成有效的许可证。
-
使用专业库:
- 如果你不想自己从头实现,可以考虑使用成熟的 Java 开源库,如 FlexNet 的某些开源实现,或者商业的软件许可解决方案,它们通常提供了更完善的功能和更高的安全性。
通过以上步骤,你就构建了一个健壮且安全的 Java 软件许可证实现,你可以根据自己产品的具体需求,在此基础上进行扩展和优化。