使用 JAX-WS (Java API for XML-Based Web Services) - 最推荐
这是目前 Java 官方、主流的 WebService 技术,如果你的 WebService 是用 JAX-WS (使用 JDK 自带的 wsimport 工具生成的,或者用框架如 Apache CXF、JAX-WS RI 实现的),那么最简单的方法是使用客户端代理。

步骤 1:获取客户端代码 (WSDL -> Java)
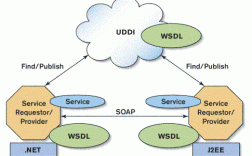
你需要从 WebService 提供方获取一个 WSDL (Web Services Description Language) 文件,这个文件描述了服务的所有接口、方法、参数和返回值。
使用 JDK 自带的 wsimport 工具可以自动生成调用服务所需的 Java 代码。
命令格式:
wsimport -keep -p com.example.client -d src http://your-webservice-url/YourService?wsdl
参数解释:

-keep: 生成源代码文件。-p com.example.client: 指定生成的 Java 包名。-d src: 指定代码生成的目录。http://.../YourService?wsdl: WebService 的 WSDL 文件地址。
执行后,会在 src/com/example/client 目录下生成一堆 .java 文件,其中最重要的是 YourService 和 YourServiceService 这两个类。
步骤 2:在 Java 代码中调用服务
生成的代码中会有一个 YourServiceService 类,它是一个工厂类,用于获取服务的代理对象。
示例代码:
import com.example.client.YourService; // 这是生成的服务接口
import com.example.client.YourServiceService; // 这是生成的服务工厂类
public class WebServiceClient {
    public static void main(String[] args) {
        try {
            // 1. 创建服务工厂对象
            // 参数是 wsdl 文件中的 <service name="...">
            YourServiceService service = new YourServiceService();
            // 2. 从工厂中获取服务的代理对象 (Port)
            // 参数是 wsdl 文件中的 <port name="..." binding="...">
            YourService yourService = service.getYourServicePort();
            // 3. 调用服务方法 (这些方法是在 wsdl 中定义的)
            // 假设服务有一个名为 sayHello 的方法,接收一个字符串参数
            String result = yourService.sayHello("World");
            // 4. 处理结果
            System.out.println("调用WebService返回的结果: " + result);
        } catch (Exception e) {
            e.printStackTrace();
        }
    }
}
使用 Apache CXF (功能更强大的框架)
Apache CXF 是一个非常流行和强大的开源框架,它支持 JAX-WS 和 JAX-RS (RESTful WebService) 等多种标准,使用 CXF 可以更灵活地调用 WebService,并且能更好地处理复杂情况(如 WS-Security)。

步骤 1:添加 Maven 依赖
在你的 pom.xml 文件中添加 CXF 的依赖。
<dependencies>
    <!-- CXF 核心依赖 -->
    <dependency>
        <groupId>org.apache.cxf</groupId>
        <artifactId>cxf-core</artifactId>
        <version>3.5.5</version> <!-- 使用最新稳定版本 -->
    </dependency>
    <!-- JAX-WS API -->
    <dependency>
        <groupId>org.apache.cxf</groupId>
        <artifactId>cxf-rt-frontend-jaxws</artifactId>
        <version>3.5.5</version>
    </dependency>
    <!-- CXF 的 Transports 模块,用于 HTTP/HTTPS 传输 -->
    <dependency>
        <groupId>org.apache.cxf</groupId>
        <artifactId>cxf-rt-transports-http</artifactId>
        <version>3.5.5</version>
    </dependency>
    <!-- 如果你需要 HTTPS 支持,还需要这个 -->
    <dependency>
        <groupId>org.apache.cxf</groupId>
        <artifactId>cxf-rt-transports-http-jetty</artifactId>
        <version>3.5.5</version>
    </dependency>
</dependencies>
步骤 2:使用 CXF 的 JaxWsProxyFactoryBean 创建客户端
CXF 提供了一种更动态的方式来创建客户端,无需预先使用 wsimport 生成代码。
示例代码:
import org.apache.cxf.jaxws.JaxWsProxyFactoryBean;
import your.package.YourService; // 你需要手动创建或从 wsdl 生成的接口
public class CxfWebServiceClient {
    public static void main(String[] args) {
        // 1. 创建 JaxWsProxyFactoryBean 实例
        JaxWsProxyFactoryBean factory = new JaxWsProxyFactoryBean();
        // 2. 设置服务接口 (必须是一个接口)
        factory.setServiceClass(your.package.YourService.class);
        // 3. 设置 WebService 的地址
        factory.setAddress("http://your-webservice-url/YourService");
        // 4. 创建客户端代理
        YourService yourService = (YourService) factory.create();
        // 5. 调用服务方法
        String result = yourService.sayHello("CXF Client");
        // 6. 处理结果
        System.out.println("调用WebService返回的结果: " + result);
    }
}
注意: 这种方法虽然方便,但你仍然需要有一个 Java 接口来定义服务的方法签名,你可以通过 wsimport 生成这个接口,或者手动根据 WSDL 文档编写。
使用 Spring Boot 集成 (在企业级应用中常用)
如果你的项目是 Spring Boot 应用,可以非常方便地集成 CXF 来调用 WebService。
步骤 1:添加 Maven 依赖
在 pom.xml 中添加 Spring Boot 和 CXF 的依赖。
<dependencies>
    <!-- Spring Boot Starter Web -->
    <dependency>
        <groupId>org.springframework.boot</groupId>
        <artifactId>spring-boot-starter-web</artifactId>
    </dependency>
    <!-- Spring Boot Starter Web Services (用于 JAX-WS) -->
    <dependency>
        <groupId>org.springframework.boot</groupId>
        <artifactId>spring-boot-starter-web-services</artifactId>
    </dependency>
    <!-- Apache CXF -->
    <dependency>
        <groupId>org.apache.cxf</groupId>
        <artifactId>cxf-spring-boot-starter-jaxws</artifactId>
        <version>3.5.5</version>
    </dependency>
</dependencies>
步骤 2:配置和调用
创建一个客户端配置类:
import org.apache.cxf.jaxws.JaxWsProxyFactoryBean;
import org.springframework.context.annotation.Bean;
import org.springframework.context.annotation.Configuration;
import your.package.YourService; // 你的服务接口
@Configuration
public class CxfClientConfig {
    @Bean
    public YourService yourServiceClient() {
        JaxWsProxyFactoryBean factory = new JaxWsProxyFactoryBean();
        factory.setServiceClass(YourService.class);
        factory.setAddress("http://your-webservice-url/YourService");
        return (YourService) factory.create();
    }
}
在 Service 或 Controller 中注入并使用:
import org.springframework.beans.factory.annotation.Autowired;
import org.springframework.stereotype.Service;
import your.package.YourService;
@Service
public class MyBusinessService {
    @Autowired
    private YourService yourService; // 注入客户端
    public void callWebService() {
        String result = yourService.sayHello("Spring Boot Client");
        System.out.println("调用WebService返回的结果: " + result);
    }
}
手动调用 (不依赖框架,使用原生 HTTP/SOAP)
这种方法最底层,不使用任何 JAX-WS 或 CXF 框架,而是通过发送 HTTP 请求,手动构造 SOAP 消息,适用于一些特殊场景,比如无法引入第三方库,或者需要精细控制 SOAP 消息的每一个细节。
示例代码 (使用 java.net.HttpURLConnection):
import java.io.BufferedReader;
import java.io.DataOutputStream;
import java.io.InputStreamReader;
import java.net.HttpURLConnection;
import java.net.URL;
public class ManualSoapClient {
    public static void main(String[] args) {
        String wsdlUrl = "http://your-webservice-url/YourService?wsdl";
        String serviceName = "YourService";
        String portName = "YourServicePort";
        String methodName = "sayHello";
        String param = "Manual Client";
        try {
            // 1. 构造 SOAP 请求体
            String soapRequest = buildSoapRequest(serviceName, portName, methodName, param);
            // 2. 创建 HTTP 连接
            URL url = new URL(wsdlUrl.replace("?wsdl", "")); // 去掉 ?wsdl
            HttpURLConnection connection = (HttpURLConnection) url.openConnection();
            connection.setRequestMethod("POST");
            connection.setRequestProperty("Content-Type", "text/xml; charset=utf-8");
            connection.setRequestProperty("SOAPAction", ""); // 有些服务需要指定Action
            connection.setDoOutput(true);
            // 3. 发送 SOAP 请求
            try (DataOutputStream out = new DataOutputStream(connection.getOutputStream())) {
                out.write(soapRequest.getBytes("UTF-8"));
                out.flush();
            }
            // 4. 获取 SOAP 响应
            int responseCode = connection.getResponseCode();
            System.out.println("Response Code: " + responseCode);
            StringBuilder response = new StringBuilder();
            try (BufferedReader in = new BufferedReader(new InputStreamReader(connection.getInputStream()))) {
                String inputLine;
                while ((inputLine = in.readLine()) != null) {
                    response.append(inputLine);
                }
            }
            // 5. 解析 SOAP 响应 (这里简单打印,实际应用中需要用 XML 解析库如 DOM4J, JAXB)
            System.out.println("SOAP Response:");
            System.out.println(response.toString());
        } catch (Exception e) {
            e.printStackTrace();
        }
    }
    private static String buildSoapRequest(String serviceName, String portName, String methodName, String param) {
        // 注意:这里的命名空间 (xmlns) 必须和 WSDL 文件中的一致!
        return "<?xml version=\"1.0\" encoding=\"utf-8\"?>" +
                "<soap:Envelope xmlns:xsi=\"http://www.w3.org/2001/XMLSchema-instance\" " +
                "xmlns:xsd=\"http://www.w3.org/2001/XMLSchema\" " +
                "xmlns:soap=\"http://schemas.xmlsoap.org/soap/envelope/\">" +
                "  <soap:Body>" +
                "    <" + methodName + " xmlns=\"http://tempuri.org/\">" + // 命名空间需要修改
                "      <name>" + param + "</name>" + // 参数名和结构需要修改
                "    </" + methodName + ">" +
                "  </soap:Body>" +
                "</soap:Envelope>";
    }
}
手动方法的缺点:
- 繁琐:需要手动构造和解析 XML。
- 脆弱:一旦服务的 WSDL 发生变化(如命名空间、参数名改变),代码就需要跟着改。
- 复杂:处理 SOAP Header、附件、安全等特性非常困难。
总结与选择建议
| 方法 | 优点 | 缺点 | 适用场景 |
|---|---|---|---|
JAX-WS (wsimport) |
标准、官方、简单直接 | 需要预先生成代码,不够灵活 | 首选方案,适用于绝大多数标准的 JAX-WS WebService。 |
| Apache CXF | 灵活、功能强大(支持WS-Security等)、无需生成代码(可选) | 需要引入 CXF 依赖 | 需要处理复杂特性(如安全、WS-Addressing)或希望更动态地调用服务时。 |
| Spring Boot 集成 | 与企业应用无缝集成、管理方便 | 需要 Spring Boot 环境 | 在 Spring/Spring Boot 项目中调用 WebService 的标准做法。 |
| 手动调用 (HTTP) | 无依赖、完全可控 | 繁琐、易错、难以维护 | 极少数特殊场景,如无法引入第三方库,或需要构造非标准 SOAP 消息。 |
给初学者的建议:
- 首选方法一 (
wsimport+ JAX-WS),这是最标准、最直接的方式,能让你快速理解 WebService 调用的本质。 - 如果你的项目已经是 Spring Boot 项目,直接使用方法三 (Spring Boot 集成),它会帮你处理好很多配置细节。
- 只有在遇到非常复杂的需求(如需要添加 WS-Security 签名)时,才考虑深入使用方法二 (Apache CXF)。
- 尽量避免使用方法四,除非你有充分的理由。