Of course! This is a classic and essential combination for Java development. Let's break down what each component is, how they work together, and how to get started.

The Three Core Components
Think of it like building a house:
- JDK (Java Development Kit): The raw materials and tools. You get wood, nails, hammers, saws, and blueprints to build things.
- Eclipse: The workshop and construction site. It's a powerful, organized space where you use your tools (JDK) to build your house (your application). It provides tables, power outlets, and a blueprint viewer to make the work easier.
- Java: The language and building code. It's the set of rules and standards that tell you how to use the materials and tools to build a safe and functional house.
Here's a more technical breakdown:
a) JDK (Java Development Kit)
The JDK is the complete software package required to develop Java applications. It's not just one thing; it's a collection of essential tools:
- Java Compiler (
javac): This is the most critical tool. It takes your human-readable Java source code (.javafiles) and translates it into Java bytecode (.classfiles), which is machine-readable for the Java Virtual Machine. - Java Runtime Environment (JRE): The JDK includes the JRE. The JRE is what you need to run a Java application. It contains the Java Virtual Machine (JVM), which is the engine that executes the bytecode, and core libraries that your application needs to function.
- Core Libraries: A vast collection of pre-written code for common tasks (handling data, networking, graphics, etc.). You don't have to reinvent the wheel; you can just use these libraries in your code.
- Debuggers, Profilers, and Documentation: Tools to help you find and fix bugs, analyze performance, and read the official Java documentation.
In short: To write Java code, you need the JDK.

b) Eclipse
Eclipse is a free, open-source Integrated Development Environment (IDE). An IDE is an application that consolidates all the tools a developer needs into one place.
- Code Editor: A smart text editor that highlights syntax, suggests code completions, and helps you spot errors as you type.
- Project Management: It helps you organize your code, libraries (JAR files), and resources into structured projects.
- Build Tools Integration: It seamlessly works with build tools like Maven or Gradle to manage dependencies and automate the build process (running
javacfor you). - Debugger: A powerful graphical debugger that lets you pause your running code, inspect variables, and step through your code line by line to find bugs.
- Version Control: Built-in support for Git and other version control systems, so you can track changes and collaborate with others.
In short: Eclipse is the "workspace" that makes using the JDK much more efficient and productive.
c) Java
This can be a bit confusing, as "Java" refers to a few things:
- The Java Programming Language: The syntax and rules for writing code.
- The Java Platform: The combination of the JVM and the core libraries that allow "Write Once, Run Anywhere" (WORA). You write your code once, and it can run on any device that has a JVM (Windows, macOS, Linux, etc.).
- The Java Development Kit (JDK): As described above, the kit to develop for the Java platform.
How They Work Together: The Workflow
This is the magic of the combination. Here’s the typical flow when you use Eclipse with the JDK:

- Setup: You install the JDK. Then you install Eclipse and tell it where you installed the JDK (this is called "configuring the JDK" or "setting the JRE").
- Coding: In Eclipse, you create a new Java project. You write your code in the editor (e.g.,
public class MyProgram { ... }). - Building (Compiling): When you're ready to test your code, you "run" it from within Eclipse. Behind the scenes, Eclipse uses the
javaccompiler from your configured JDK to compile your.javafiles into.classfiles. - Running: The JVM, also part of your JDK, then takes the compiled
.classfiles and executes them. The output is displayed in the Eclipse console. - Debugging: If something goes wrong, you use Eclipse's graphical debugger to step through your code, inspecting variables at each step to find the bug.
How to Get Started (Step-by-Step Guide)
Step 1: Download and Install the JDK
- Go to the official Oracle Java SE Development Kit download page: https://www.oracle.com/java/technologies/downloads/
- Accept the license agreement.
- Download the installer for your operating system (Windows, macOS, Linux).
- Run the installer and follow the on-screen instructions. Remember the installation path! It will be something like
C:\Program Files\Java\jdk-21on Windows or/Library/Java/JavaVirtualMachines/jdk-21.jdk/on macOS.
Step 2: Download and Install Eclipse
- Go to the official Eclipse download page: https://www.eclipse.org/downloads/
- Click the "Download" button for "Eclipse IDE for Java Developers". This package comes with everything you need for basic Java development.
- Eclipse is a "portable" application. It doesn't have an installer. You will download a
.zipfile. - Extract the
.zipfile to a permanent location on your computer (e.g.,C:\dev\eclipseor/Users/yourname/dev/eclipse).
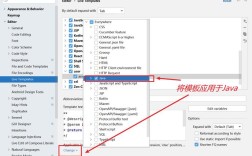
Step 3: Configure Eclipse to Use Your JDK
This is the most crucial step. Eclipse needs to know where to find your JDK.
- Launch the Eclipse application (find
eclipse.exeon Windows or the Eclipse.app on macOS). - The first time you run it, it will ask you to choose a "workspace." This is the folder where your projects will be stored. Choose a convenient location and click "Launch".
- Once the Eclipse IDE is open, go to the menu:
- Windows -> Preferences (On macOS: Eclipse -> Settings)
- In the Preferences window, navigate to:
- Java -> Installed JREs
- You will likely see a list of JREs. Click the "Add..." button.
- In the dialog, select "Standard VM" and click "Next".
- In the "JRE home" field, click "Directory..." and browse to the installation path of your JDK (from Step 1). For example,
C:\Program Files\Java\jdk-21. - Click "Finish". You should now see your JDK in the list.
- Important: Make sure the checkbox next to your new JDK is checked. This tells Eclipse to use it as the default.
- Click "Apply and Close".
You are now ready to code!
Step 4: Create Your First Project
- In Eclipse, go to File -> New -> Java Project.
- Give your project a name (e.g.,
HelloWorld). - Ensure the "JRE" dropdown is set to the JDK you just configured (e.g.,
jdk-21). - Click "Finish".
- Eclipse will create the project. In the "Project Explorer" view on the left, you will see your project.
- Right-click on the
srcfolder, go to New -> Class. - Enter a name for your class (e.g.,
MyProgram). Make sure the "public static void main(String[] args)" checkbox is checked. This will create the main method, which is the entry point for your program. - Click "Finish".
- A new file will open. Inside the
mainmethod, type:System.out.println("Hello, Eclipse and JDK!"); - Right-click on your
MyProgram.javafile in the Project Explorer and select Run As -> Java Application.
You should see "Hello, Eclipse and JDK!" printed in the console at the bottom of the screen. Congratulations