Of course! Here is a comprehensive guide to using Java in the Eclipse IDE, covering everything from installation to advanced features.

What is Eclipse?
Eclipse is a free, open-source, and highly extensible Integrated Development Environment (IDE). While it's most famous for Java development, it also supports a vast array of other programming languages through plugins (like C/C++, PHP, Python, JavaScript, etc.). It's developed and maintained by the Eclipse Foundation.
Part 1: Installation and Setup
Prerequisites: Install the Java Development Kit (JDK)
Before you can use Eclipse for Java development, you must have a JDK installed on your system. The JDK contains the compiler (javac) and the Java Runtime Environment (JRE).
- Download: Go to the official Oracle website or a trusted provider like Adoptium (formerly AdoptOpenJDK).
- Oracle JDK Download
- Eclipse Temurin (Adoptium) Download (Recommended for most users as it's free and has no commercial restrictions).
- Installation: Run the installer and follow the on-screen instructions. Remember the installation path (e.g.,
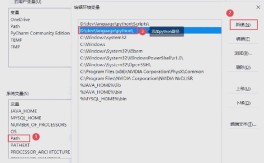
C:\Program Files\Java\jdk-17). - Set Environment Variables (Important):
- Windows:
- Open the "Edit the system environment variables" control panel.
- Click "Environment Variables...".
- Under "System variables", find the
Pathvariable and click "Edit...". - Click "New" and add the path to your JDK's
bindirectory (e.g.,C:\Program Files\Java\jdk-17\bin). - Click OK on all windows.
- macOS/Linux: Add the following line to your shell's configuration file (
.bash_profile,.zshrc, etc.):export JAVA_HOME=/path/to/your/jdk (e.g., /usr/lib/jvm/java-17-openjdk-amd64) export PATH=$JAVA_HOME/bin:$PATH
- Verify: Open a new terminal/command prompt and type
java -versionandjavac -version. You should see the version of your installed JDK.
- Windows:
Download and Install Eclipse
- Download: Go to the Eclipse IDE for Java Developers download page. Make sure you download the version that matches your operating system and architecture.
- Install (It's a ZIP file!):
- Windows: Extract the downloaded
.zipfile to a location likeC:\. It's recommended to rename the extracted folder to something simple likeC:\eclipse. - macOS: Extract the
.tar.gzfile. Drag theEclipse.appinto yourApplicationsfolder. - Linux: Extract the
.tar.gzfile to a location like/opt/. You can run it from the terminal by navigating to theeclipsefolder and running./eclipse.
- Windows: Extract the downloaded
Launch and Configure Workspace
- Launch Eclipse:
- Windows: Run
eclipse.exe. - macOS: Launch
Eclipse.app. - Linux: Run
./eclipsefrom the terminal.
- Windows: Run
- Select Workspace: The first time you launch Eclipse, it will ask you to select a "Workspace". This is a folder where all your projects will be stored. Choose a convenient location and click "Launch".
Part 2: Creating Your First Java Project
Let's create a simple "Hello, World!" application.
-
Create a New Project:
 (图片来源网络,侵删)
- Go to
File->New->Java Project. - Project Name: Enter
HelloWorld. - JRE: Ensure the correct JDK is selected (e.g.,
JavaSE-17). If not, click "Configure JREs..." and add your JDK. - Click "Finish".
- Go to
-
Create a New Class:
- In the "Project Explorer" view on the left, right-click on the
HelloWorldproject. - Go to
New->Class. - Package: Enter
com.example.hello. (Packages are a way to organize your code; follow a reverse-domain-name convention). - Name: Enter
Main. - Check "public static void main(String[] args)": This is crucial, as it creates the entry point for your application.
- Click "Finish".
- In the "Project Explorer" view on the left, right-click on the
-
Write the Code: Eclipse will generate a template file. Inside the
mainmethod, add the following line:package com.example.hello; public class Main { public static void main(String[] args) { // Print "Hello, World!" to the console System.out.println("Hello, World!"); } } -
Run the Program:
- Method 1 (Easy): Right-click anywhere inside the
Main.javafile and selectRun As->Java Application. - Method 2 (Icon): Click the green "play" icon in the toolbar.
- Method 3 (Shortcut): Press
Ctrl + F11(Windows/Linux) orCmd + F11(macOS).
- Method 1 (Easy): Right-click anywhere inside the
-
View the Output: The "Console" view at the bottom of the screen will appear and display:
 (图片来源网络,侵删)
Hello, World!
Part 3: Essential Eclipse Features
The Workbench Views
- Package Explorer: The file manager for your projects. It shows your source code in a structured way (packages, classes, etc.).
- Outline: Shows a structured outline of the currently active file (e.g., all methods and fields in a class). Clicking on an item in the Outline jumps to that line in the editor.
- Console: Displays the output of your program, including
System.out.println()and error messages. - Problems: Lists all compilation errors, warnings, and other issues in your project. It's your best friend for debugging.
Code Assistance (IntelliSense)
Eclipse provides powerful auto-completion and code suggestions. Just start typing, and a list of suggestions will appear. Press Ctrl + Space to manually trigger it.
Refactoring
Refactoring is the process of changing the internal structure of code without changing its external behavior. Eclipse makes this incredibly easy.
- Rename: Right-click a variable, method, or class ->
Refactor->Rename. Eclipse will update all references throughout your code. - Extract Method: Select a block of code ->
Refactor->Extract Method.... Eclipse will wrap the selected code in a new method for you.
Debugging
This is a critical skill for finding bugs.
- Set a Breakpoint: Double-click in the gray margin to the left of a line of code where you want the program to pause.
- Launch in Debug Mode: Right-click the file ->
Debug As->Java Application. - Debug Perspective: Eclipse will switch to the "Debug" perspective. You'll see:
- Debug View: Shows the call stack of your program.
- Variables View: Shows the current values of all variables in scope.
- Expressions View: Allows you to watch the value of specific expressions.
- Control Execution:
- F6 (Step Over): Executes the current line and moves to the next one.
- F5 (Step Into): If the current line is a method call, it steps into that method.
- F7 (Step Return): Finishes executing the current method and returns to the caller.
- F8 (Resume): Continues execution until the next breakpoint.
Managing Dependencies (Maven/Gradle)
For any non-trivial project, you'll need external libraries (dependencies). Eclipse has excellent built-in support for Maven and Gradle.
- Convert a Project to Maven:
- Right-click your project ->
Configure->Convert to Maven Project. - Eclipse will create a
pom.xmlfile. - Edit the
pom.xmlto add your dependencies. Eclipse will automatically download them.<dependencies> <dependency> <groupId>org.slf4j</groupId> <artifactId>slf4j-api</artifactId> <version>2.0.7</version> </dependency> </dependencies>
- Right-click your project ->
Part 4: Useful Tips and Shortcuts
| Feature | Windows/Linux Shortcut | macOS Shortcut |
|---|---|---|
| Quick Access | Ctrl + 3 |
Cmd + 3 |
| Format Code | Ctrl + Shift + F |
Cmd + Shift + F |
| Organize Imports | Ctrl + Shift + O |
Cmd + Shift + O |
| Quick Fix | Ctrl + 1 |
Cmd + 1 |
| Navigate to Superclass/Interface | F4 |
Cmd + T |
| Navigate to a Method/Field | Ctrl + Shift + R (Open Resource) |
Cmd + Shift + R |
| Search in Files | Ctrl + H |
Cmd + H |
| Toggle Comment | Ctrl + / |
Cmd + / |
| Source Code | Alt + Shift + S |
Cmd + Alt + S |
Part 5: Troubleshooting Common Issues
- "Could not find the main class" or "Launch configuration not found": This usually means the
mainmethod is not in a public class, the class name doesn't match the file name, or the project wasn't built correctly. Try cleaning the project (Project->Clean...) and running it again. - "The import XXX cannot be resolved": This means Eclipse cannot find the required library. If using Maven/Gradle, check your
pom.xmlorbuild.gradlefile and refresh the project (right-click ->Maven->Update Project). If it's a standard Java library, ensure your JDK is correctly configured. - Eclipse is running very slowly: This can be due to several reasons:
- Increase the JVM heap size for Eclipse by editing the
eclipse.inifile (in the Eclipse installation directory) and changing the-Xmxand-Xmsvalues. - Disable unnecessary plugins in
Help->About Eclipse->Installation Details->Software Sites. - Your workspace might be too large or corrupted. Try creating a new workspace and importing your projects.
- Increase the JVM heap size for Eclipse by editing the
Conclusion
Eclipse is a powerful, mature, and free IDE that has been a cornerstone of Java development for decades. While it has a steeper learning curve than some modern alternatives, its power, stability, and unmatched plugin ecosystem make it an excellent choice for both beginners and professional developers. Mastering its core features will significantly boost your productivity.