Of course! Let's build a simple but functional Peer-to-Peer (P2P) application in Java using Sockets. This is a classic topic and a great way to understand network programming.
Core Concepts of a Simple P2P System
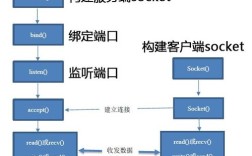
For this example, we'll create a system where two peers can connect directly to each other and send messages. The key challenge in P2P is NAT Traversal—getting through routers/firewalls that assign private local IP addresses (like 168.x.x). Our simple example will work if both peers are on the same local network (e.g., connected to the same Wi-Fi). For internet-wide P2P, you'd need more advanced techniques like UDP Hole Punching or a "rendezvous server."
Our simple P2P application will have two main parts, which we'll put into two separate Java files:
Peer.java: The main class that will act as both a client (to connect to another peer) and a server (to listen for incoming connections).MessageHandler.java: AThreadthat will continuously listen for messages from the connected peer and print them to the console.
Step 1: The MessageHandler Thread
This is a helper class. Once a connection is established, this thread will run in the background to read any data sent from the other peer. This prevents our main program from getting stuck waiting for input.
MessageHandler.java
import java.io.BufferedReader;
import java.io.IOException;
import java.io.InputStreamReader;
import java.net.Socket;
/**
 * A thread to listen for messages from a connected peer.
 */
public class MessageHandler extends Thread {
    private Socket socket;
    public MessageHandler(Socket socket) {
        this.socket = socket;
    }
    @Override
    public void run() {
        try (BufferedReader in = new BufferedReader(new InputStreamReader(socket.getInputStream()))) {
            String message;
            // Keep reading messages until the connection is closed
            while ((message = in.readLine()) != null) {
                System.out.println("\nPeer says: " + message);
                System.out.print("You: "); // Re-prompt the user
            }
        } catch (IOException e) {
            // This exception is normal when the peer disconnects
            System.out.println("Connection to peer lost.");
        } finally {
            try {
                socket.close();
            } catch (IOException e) {
                e.printStackTrace();
            }
        }
    }
}
Step 2: The Main Peer Class
This is the heart of our application. It can either host a server or connect to an existing peer.
Peer.java
import java.io.BufferedReader;
import java.io.IOException;
import java.io.InputStreamReader;
import java.io.PrintWriter;
import java.net.ServerSocket;
import java.net.Socket;
import java.net.UnknownHostException;
import java.util.Scanner;
public class Peer {
    private static final int PORT = 12345; // A port for communication
    public static void main(String[] args) {
        Scanner scanner = new Scanner(System.in);
        System.out.println("--- Java P2P Chat Application ---");
        System.out.println("1. Host a chat (wait for connection)");
        System.out.println("2. Connect to a peer");
        System.out.print("Choose an option: ");
        int choice = scanner.nextInt();
        scanner.nextLine(); // Consume the newline character
        try {
            if (choice == 1) {
                hostChat(scanner);
            } else if (choice == 2) {
                connectToPeer(scanner);
            } else {
                System.out.println("Invalid choice.");
            }
        } catch (IOException e) {
            System.err.println("An error occurred: " + e.getMessage());
            e.printStackTrace();
        } finally {
            scanner.close();
        }
    }
    /**
     * Method to host a chat session. This peer will act as a server.
     */
    private static void hostChat(Scanner scanner) throws IOException {
        System.out.println("Hosting on port " + PORT + "...");
        System.out.println("Waiting for another peer to connect...");
        try (ServerSocket serverSocket = new ServerSocket(PORT)) {
            // The accept() method blocks until a client connects
            Socket clientSocket = serverSocket.accept();
            System.out.println("Peer connected: " + clientSocket.getInetAddress().getHostAddress());
            runChat(clientSocket, scanner);
        }
    }
    /**
     * Method to connect to an existing chat host.
     */
    private static void connectToPeer(Scanner scanner) throws IOException {
        System.out.print("Enter the host IP address (e.g., 192.168.1.100): ");
        String hostName = scanner.nextLine();
        System.out.print("Enter the port (default " + PORT + "): ");
        int port = PORT; // Default port
        // You could add logic here to read a different port if needed
        try (Socket socket = new Socket(hostName, port)) {
            System.out.println("Connected to peer at " + hostName + ":" + port);
            runChat(socket, scanner);
        } catch (UnknownHostException e) {
            System.err.println("Don't know about host " + hostName);
        } catch (IOException e) {
            System.err.println("Couldn't get I/O for the connection to " + hostName);
        }
    }
    /**
     * The core chat logic, shared by both host and client.
     */
    private static void runChat(Socket socket, Scanner scanner) throws IOException {
        // Set up writer to send messages
        try (PrintWriter out = new PrintWriter(socket.getOutputStream(), true);
             BufferedReader in = new BufferedReader(new InputStreamReader(socket.getInputStream()))) {
            // Start the message handler thread to listen for incoming messages
            MessageHandler messageHandler = new MessageHandler(socket);
            messageHandler.start();
            System.out.println("Chat started. Type 'exit' to quit.");
            System.out.print("You: ");
            // Main loop to read user input and send it
            while (true) {
                String userInput = scanner.nextLine();
                if ("exit".equalsIgnoreCase(userInput)) {
                    break;
                }
                out.println(userInput);
                System.out.print("You: ");
            }
        }
    }
}
Step 3: How to Run the P2P Application
This is the most crucial part. Since you need two instances of the program, you can't just run the main method twice from the same IDE.
Method 1: Using Two Command-Line Windows (Recommended)
-
Compile the code: Open a terminal or command prompt, navigate to the directory where you saved the files, and compile them:
javac Peer.java MessageHandler.java
-
Run the first peer (The Host): In the first terminal window, run the
Peerclass and choose option1.java Peer
You will see output like this:
--- Java P2P Chat Application ---
1. Host a chat (wait for connection)
2. Connect to a peer
Choose an option: 1
Hosting on port 12345...
Waiting for another peer to connect...
The program will now be waiting. Do not close this window.
-
Find the Host's IP Address: In the same first terminal window, find out its local IP address. On Windows, type
ipconfig. On macOS/Linux, typeifconfigorip a. Look for the IP address under your active network adapter (e.g., Wi-Fi or Ethernet). It will look something like168.1.10or0.0.5. Note this IP address. -
Run the second peer (The Client): In a second terminal window, run the
Peerclass again and choose option2.java Peer
You will see:
--- Java P2P Chat Application ---
1. Host a chat (wait for connection)
2. Connect to a peer
Choose an option: 2
Enter the host IP address (e.g., 192.168.1.100):
Now, type the IP address you noted in step 3 and press Enter.
Enter the host IP address (e.g., 192.168.1.100): 192.168.1.10
Enter the port (default 12345):
Press Enter to use the default port.
-
Chat! The second peer will connect, and both terminals will show a "Chat started" message. You can now type messages in either terminal, and they will appear in the other. Type
exitin either terminal to close the connection.
Method 2: Using Your IDE (e.g., IntelliJ or Eclipse)
Most IDEs allow you to run multiple instances of a configuration.
-
Compile: Build the project to ensure there are no errors.
-
Run Instance 1 (Host):
- Right-click on
Peer.javaand select "Run 'Peer.main()'". - Choose option
1. The program will start and wait.
- Right-click on
-
Find IP Address: Find your machine's local IP address as described in Method 1.
-
Run Instance 2 (Client):
- Go to "Run" -> "Edit Configurations...".
- Click the "+" icon to add a new configuration. Select "Application".
- Give it a name (e.g., "Peer-Client").
- For the "main class", select
Peer. - Go to the "Program arguments" tab.
- In the "Before launch" section, click the "+" and select "Run another configuration". Select the original "Peer" configuration you just ran. This ensures both instances are built.
- Crucially, you need to pass arguments to the second instance. The easiest way is to modify
Peer.javato accept command-line arguments instead of usingScannerfor the initial choice. For a quick test, you can manually change the code inmaintoconnectToPeer(scanner);for the second run.
A simpler approach for the IDE is to just run the first instance, copy its IP, and then manually edit the
mainmethod inPeer.javato force it to be a client before running the second time.
Limitations and Next Steps
This is a great starting point, but it has limitations:
- NAT/Firewall Issues: This will not work over the internet unless both peers have manually forwarded port
12345on their routers to their local machines (Port Forwarding). This is a major hurdle for true P2P. - Static IP: You have to manually find and type the IP address.
- No Discovery: There's no way for peers to find each other on a network.
How to improve this:
- UDP Hole Punching: This is the most common technique for establishing a direct connection between two peers behind NATs without port forwarding. It involves a third "rendezvous server" to help the peers discover each other's public addresses.
- Peer Discovery: Implement a simple discovery mechanism using UDP broadcasting. A peer can broadcast a "hello" message on the local network, and other peers can respond with their IP address.
- GUI: Add a graphical user interface (using JavaFX or Swing) for a more user-friendly experience.
- File Sharing: Extend the protocol to not just send text messages but also stream files. This would involve defining a message format (e.g., "FILE:filename.txt:filesize") and handling binary data.