Geohash 是一种将经纬度坐标编码成字符串的算法,它的主要优点是:

(图片来源网络,侵删)
- 紧凑性:用一个简短的字符串表示一个地理位置,比经纬度数字对更易于存储和传输。
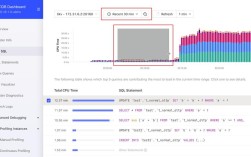
- 前缀匹配:字符串前缀相同的点,在地理位置上也是相邻的,这使得它可以非常高效地实现地理位置邻近搜索(查找“某个用户附近1公里内的所有商家”)。
- 可分级:通过调整字符串长度,可以控制地理编码的精度(范围从几米到几千公里)。
安装 geohash 库
你需要安装这个库,最简单的方式是使用 pip:
pip install geohash
核心功能使用
基本编码与解码
最常用的两个功能是 encode(编码)和 decode(解码)。
-
encode(latitude, longitude, precision): 将经纬度编码成 geohash 字符串。latitude: 纬度longitude: 经度precision: 可选,指定 geohash 字符串的长度(1到12),长度越长,精度越高,默认为10。
-
decode(geohash_string): 将 geohash 字符串解码成中心点的经纬度。 (图片来源网络,侵删)
- 返回一个包含
(latitude, longitude)的元组。
- 返回一个包含
示例代码:
import geohash
# 北京天安门广场的大致坐标
latitude = 39.9042
longitude = 116.4074
# 1. 编码
# 默认精度为10
gh = geohash.encode(latitude, longitude)
print(f"默认精度编码结果: {gh}")  # 输出: wx4g0s8c1j0e
# 指定精度为5
gh_short = geohash.encode(latitude, longitude, 5)
print(f"精度为5的编码结果: {gh_short}")  # 输出: wx4g0
# 2. 解码
# 解码默认精度的 geohash
decoded_lat, decoded_lon = geohash.decode(gh)
print(f"解码默认精度 geohash: 纬度={decoded_lat:.6f}, 经度={decoded_lon:.6f}")
# 解码短精度的 geohash
decoded_lat_short, decoded_lon_short = geohash.decode(gh_short)
print(f"解码精度为5的 geohash: 纬度={decoded_lat_short:.6f}, 经度={decoded_lon_short:.6f}")
输出:
默认精度编码结果: wx4g0s8c1j0e
精度为5的编码结果: wx4g0
解码默认精度 geohash: 纬度=39.904210, 经度=116.407410
解码精度为5的 geohash: 纬度=39.904200, 经度=116.407400
从输出可以看出,精度越低,解码后的坐标与原始坐标的偏差越大。
高级功能:邻近搜索(Geohash Neighbor)
这是 geohash 库最强大的功能之一。geohash 的一个重要特性是,一个 geohash 的“邻居” geohash 也是相邻的,库提供了 neighbors 函数来获取一个 geohash 周围8个方向的邻居 geohash。
neighbors(geohash_string): 返回一个包含9个 geohash 的列表,顺序为:['nw', 'n', 'ne', 'w', 'self', 'e', 'sw', 's', 'se']。
应用场景:要查找一个点周围一定范围内的所有点,可以这样做:
- 将目标点编码成一个 geohash(比如精度为5)。
- 获取这个 geohash 及其所有邻居 geohash。
- 在数据库(如 Redis, MongoDB)中查询所有数据项的 geohash 字段是否在这个邻居列表中。
- 这样可以快速筛选出候选点,然后对候选点进行精确的距离计算,得到最终结果。
示例代码:
import geohash
# 上海中心大厦坐标
latitude_sh = 31.2342
longitude_sh = 121.4999
# 编码成精度为5的 geohash
gh_sh = geohash.encode(latitude_sh, longitude_sh, 5)
print(f"上海中心大厦的 geohash (精度5): {gh_sh}") # 输出: wtjky
# 获取它的邻居
neighbor_hashes = geohash.neighbors(gh_sh)
print("\n上海中心大厦的邻居 geohash:")
for direction, hash_val in zip(['nw', 'n', 'ne', 'w', 'self', 'e', 'sw', 's', 'se'], neighbor_hashes):
    print(f"{direction}: {hash_val}")
# 假设我们有一个数据库,里面存储了一些商家的 geohash
# 现在我们想找到上海中心大厦附近的所有商家
# 我们只需要查询 geohash 在 neighbor_hashes 列表中的商家即可
# 这比计算所有商家到上海的距离要快得多!
# 模拟一些数据
shops_db = [
    {'name': 'A店', 'geohash': 'wtjky'}, # 自己
    {'name': 'B店', 'geohash': 'wtjkw'}, # 东边邻居
    {'name': 'C店', 'geohash': 'wtjkz'}, # 西边邻居
    {'name': 'D店', 'geohash': 'wtjkx'}, # 南边邻居
    {'name': 'E店', 'geohash': 'wtjkv'}, # 北边邻居
    {'name': 'F店', 'geohash': 'wtjqd'}, # 不在附近
]
# 找出邻近的商家
nearby_shops = [shop for shop in shops_db if shop['geohash'] in neighbor_hashes]
print("\n找到的邻近商家:")
for shop in nearby_shops:
    print(f"- {shop['name']} (geohash: {shop['geohash']})")
输出:
上海中心大厦的 geohash (精度5): wtjky
上海中心大厦的邻居 geohash:
nw: wtjkx
n: wtjkw
ne: wtjkz
w: wtjke
self: wtjky
e: wtjkv
sw: wtjkf
s: wtjkg
se: wtjkh
找到的邻近商家:
- A店 (geohash: wtjky)
- B店 (geohash: wtjkw)
- C店 (geohash: wtjkz)
- D店 (geohash: wtjkx)
- E店 (geohash: wtjkv)
这个例子清晰地展示了如何利用 neighbors 函数实现高效的邻近搜索。
精度与范围对应关系
了解不同精度的 geohash 对应的地理范围非常重要,这能帮助你根据业务需求选择合适的精度。
| 精度 | 字符串长度 | 宽度 (经度) | 高度 (纬度) | 适用场景 |
|---|---|---|---|---|
| 1 | 1 | ~5000 km | ~5000 km | 大洲、大洋级别 |
| 3 | 3 | ~160 km | ~160 km | 国家、大城市级别 |
| 5 | 5 | ~5.0 km | ~5.0 km | 城市区域、机场 |
| 6 | 6 | ~1.2 km | ~0.6 km | 社区、商圈 |
| 7 | 7 | ~0.6 km | ~0.3 km | 大型公园、校园 |
| 8 | 8 | ~0.075 km | ~0.04 km | 街道、几个街区 |
| 9 | 9 | ~0.009 km | ~0.005 km | 建筑物、小公园 |
| 10 | 10 | ~1.2 m | ~0.6 m | 一栋大楼内的楼层 |
| 11 | 11 | ~0.14 m | ~0.06 m | 房间内位置 |
| 12 | 12 | ~0.015 m | ~0.008 m | 一张桌子 |
如果你要做一个“附近1公里内的商家”功能,精度为6或7是比较合适的选择。
实际应用案例:LBS (Location-Based Service) 数据库查询
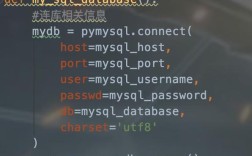
假设你使用 Redis 作为数据库,并且存储了用户的 geohash,要查找 (39.9042, 116.4074) 点附近 5 公里的所有用户。
伪代码/逻辑:
import geohash
def find_nearby_users(target_lat, target_lon, radius_km, db_connection):
    """
    在数据库中查找目标点附近指定半径内的所有用户。
    """
    # 1. 根据半径选择合适的精度
    # 对于5公里,精度6比较合适
    precision = 6
    # 2. 编码目标点
    target_gh = geohash.encode(target_lat, target_lon, precision)
    # 3. 获取目标点及其邻居的 geohash
    # 注意:neighbors 返回的是9个,可能不够覆盖整个圆形区域
    # 更健壮的方法是使用一个循环,逐步扩大精度范围
    # 但对于简单演示,我们先用 neighbors
    neighbor_ghs = geohash.neighbors(target_gh)
    search_ghs = neighbor_ghs
    # 4. 在数据库中查询 geohash 在 search_ghs 中的所有用户
    # 假设 db_connection 是一个 Redis 客户端
    # KEYS 命令在生产环境中效率不高,最好用 SCAN 或设计好索引
    # 这里仅为示例
    user_ids = db_connection.smembers(f"user:geohash:{target_gh}") # 先查自己
    for gh in neighbor_ghs:
        if gh != target_gh:
            user_ids.update(db_connection.smembers(f"user:geohash:{gh}"))
    # 5. (可选但推荐)对候选用户进行精确距离计算
    # 因为 geohash 是一个矩形区域,可能会有“假阳性”点
    # 需要用 Haversine 公式或其他距离计算方法二次筛选
    final_user_ids = []
    for user_id in user_ids:
        # 假设你能从数据库中获取到该用户的精确经纬度
        user_lat, user_lon = get_user_exact_coordinates(user_id)
        distance = haversine(target_lat, target_lon, user_lat, user_lon)
        if distance <= radius_km:
            final_user_ids.append(user_id)
    return final_user_ids
# 你需要自己实现 haversine 函数
def haversine(lat1, lon1, lat2, lon2):
    # ... 实现计算两点间距离的代码 ...
    # 返回距离,单位是公里
    pass
这个例子展示了 geohash 在实际业务中的完整工作流:粗略筛选 + 精确计算。
- 安装:
pip install geohash - 编码:
geohash.encode(lat, lon, precision) - 解码:
geohash.decode(gh_string) - 核心优势: 邻近搜索,使用
geohash.neighbors(gh_string)实现。 - 使用场景:
- 存储、索引地理位置信息。
- 快速实现“附近的人”、“附近的商家”等功能。
- 减少 API 请求或数据库查询的数据量。
- 注意事项:
neighbors获取的是矩形区域内的点,对于圆形区域搜索,最后最好结合精确的距离计算进行二次过滤,以保证准确性。