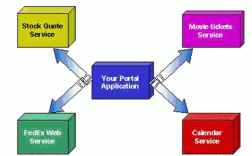
我将为你详细介绍几种主流的方法,从最经典的 SOAP 到现代的 RESTful。

(图片来源网络,侵删)
目录
- 调用 SOAP WebService
- 使用 JDK 自带的
wsimport工具 (推荐,最经典) - 使用 Apache CXF 框架 (更灵活,功能强大)
- 使用 JDK 自带的
- 调用 RESTful WebService (基于 HTTP/JSON)
- 使用 Apache HttpClient (最灵活,但代码繁琐)
- 使用 OkHttp (现代、简洁)
- 使用 Spring 的
RestTemplate(企业级标准) - 使用 Spring Boot 的
WebClient(异步、非阻塞,未来趋势)
- 总结与对比
调用 SOAP WebService
SOAP (Simple Object Access Protocol) 是一种基于 XML 的协议,通常通过 WSDL (Web Services Description Language) 文档来描述其接口。
使用 JDK 自带的 wsimport 工具 (最经典)
这是最传统、最直接的方法,无需额外引入第三方库。
步骤:
获取 WSDL 文件地址
一个公共的 WebService 地址:http://ws.webxml.com.cn/WebServices/MobileCodeWS.asmx?wsdl

(图片来源网络,侵删)
使用 wsimport 生成客户端代码
打开命令行(CMD 或 PowerShell),执行以下命令:
# -keep: 生成源代码
# -d: 指定编译后的 .class 文件存放目录
# -p: 指定生成的包名
wsimport -keep -d D:\temp -p com.example.client http://ws.webxml.com.cn/WebServices/MobileCodeWS.asmx?wsdl
执行后,会在 D:\temp\com\example\client 目录下生成一堆 .java 和 .class 文件。
在 Java 项目中使用生成的代码
将生成的 .java 文件(或直接将 .jar 包)引入到你的项目中。
编写调用代码

(图片来源网络,侵删)
import com.example.client.MobileCodeWS;
import com.example.client.MobileCodeWSLocator;
import com.example.client.getMobileInfo;
public class SoapClientTest {
    public static void main(String[] args) {
        try {
            // 1. 创建服务定位器,用于获取服务端口
            MobileCodeWS service = new MobileCodeWSLocator();
            // 2. 获取服务端口 (接口)
            // 注意:这里的 getMobileCodeWS 是从 WSDL 生成的端口名,可能不同服务不同
            com.example.client.MobileCodeWS_PortType port = service.getMobileCodeWS();
            // 3. 创建调用参数对象
            getMobileInfo request = new getMobileInfo();
            request.setMobileCode("13800138000");
            request.setUserId(""); // 如果需要用户ID,否则传空
            // 4. 调用方法并获取返回结果
            String result = port.getMobileInfo(request);
            // 5. 处理结果
            System.out.println("调用结果:");
            System.out.println(result);
        } catch (Exception e) {
            e.printStackTrace();
        }
    }
}
优点:
- JDK 自带,无需额外依赖。
- 官方支持,稳定可靠。
- 生成的代码类型安全,易于使用。
缺点:
- 依赖 WSDL,对于没有 WSDL 的 SOAP 服务无法使用。
- 生成的代码可能比较冗余,难以自定义。
使用 Apache CXF 框架
Apache CXF 是一个功能强大的开源框架,支持 SOAP、RESTful 等多种协议,并且可以更灵活地处理请求和响应。
添加 Maven 依赖
<dependencies>
    <!-- cxf 核心依赖 -->
    <dependency>
        <groupId>org.apache.cxf</groupId>
        <artifactId>cxf-rt-frontend-jaxws</artifactId>
        <version>3.4.5</version> <!-- 使用较新版本 -->
    </dependency>
    <!-- cxf 的运行时依赖,包含 Jetty 服务器等 -->
    <dependency>
        <groupId>org.apache.cxf</groupId>
        <artifactId>cxf-rt-transports-http</artifactId>
        <version>3.4.5</version>
    </dependency>
</dependencies>
创建客户端接口
CXF 可以通过注解直接在客户端代码中定义接口,无需 wsimport。
import javax.jws.WebMethod;
import javax.jws.WebParam;
import javax.jws.WebService;
import javax.xml.bind.annotation.XmlSeeAlso;
// @WebService 注解表明这是一个 WebService 接口
@WebService(targetNamespace = "http://WebXml.com.cn/", name = "MobileCodeWS")
@XmlSeeAlso({ObjectFactory.class})
public interface MobileCodeWSService {
    // @WebMethod 指定要调用的方法
    @WebMethod
    String getMobileInfo(
        @WebParam(name = "mobileCode", targetNamespace = "http://WebXml.com.cn/") String mobileCode,
        @WebParam(name = "userId", targetNamespace = "http://WebXml.com.cn/") String userId
    );
}
编写调用代码
import org.apache.cxf.jaxws.JaxWsProxyFactoryBean;
public class CxfClientTest {
    public static void main(String[] args) {
        // 1. 创建 JaxWsProxyFactoryBean
        JaxWsProxyFactoryBean factory = new JaxWsProxyFactoryBean();
        // 2. 设置服务接口
        factory.setServiceClass(MobileCodeWSService.class);
        // 3. 设置 WebService 地址
        factory.setAddress("http://ws.webxml.com.cn/WebServices/MobileCodeWS.asmx");
        // 4. 创建客户端代理对象
        MobileCodeWSService service = (MobileCodeWSService) factory.create();
        // 5. 直接调用接口方法
        String result = service.getMobileInfo("13800138000", "");
        // 6. 处理结果
        System.out.println("调用结果:");
        System.out.println(result);
    }
}
优点:
- 灵活性高,无需预生成代码。
- 可以方便地拦截请求/响应,添加 SOAP Header 等。
- 功能强大,支持 WS-* 标准。
缺点:
- 需要引入额外的框架依赖。
调用 RESTful WebService (基于 HTTP/JSON)
RESTful WebService 遵循 REST 架构风格,通常使用 HTTP 协议(GET, POST, PUT, DELETE),数据格式多为 JSON。
使用 Apache HttpClient (最灵活,但代码繁琐)
这是最底层的 HTTP 客户端,可以完全控制请求的每一个细节。
添加 Maven 依赖
<dependency>
    <groupId>org.apache.httpcomponents</groupId>
    <artifactId>httpclient</artifactId>
    <version>4.5.13</version>
</dependency>
<!-- 如果需要处理 JSON,需要添加 JSON 库,如 Jackson 或 Gson -->
<dependency>
    <groupId>com.fasterxml.jackson.core</groupId>
    <artifactId>jackson-databind</artifactId>
    <version>2.13.1</version>
</dependency>
编写调用代码
import org.apache.http.HttpEntity;
import org.apache.http.client.methods.CloseableHttpResponse;
import org.apache.http.client.methods.HttpGet;
import org.apache.http.client.methods.HttpPost;
import org.apache.http.entity.StringEntity;
import org.apache.http.impl.client.CloseableHttpClient;
import org.apache.http.impl.client.HttpClients;
import org.apache.http.util.EntityUtils;
import com.fasterxml.jackson.databind.ObjectMapper;
import java.io.IOException;
public class HttpClientTest {
    public static void main(String[] args) {
        // 示例:调用一个公共的 JSONPlaceholder API
        String url = "https://jsonplaceholder.typicode.com/posts/1";
        // 1. 创建 HttpClient 实例
        try (CloseableHttpClient httpClient = HttpClients.createDefault()) {
            // 2. 创建 HTTP GET 请求
            HttpGet request = new HttpGet(url);
            // 3. 执行请求并获取响应
            try (CloseableHttpResponse response = httpClient.execute(request)) {
                // 4. 获取响应实体
                HttpEntity entity = response.getEntity();
                if (entity != null) {
                    // 5. 将响应实体转换为字符串
                    String resultJson = EntityUtils.toString(entity);
                    System.out.println("GET 请求结果:");
                    System.out.println(resultJson);
                    // 6. 使用 Jackson 将 JSON 字符串解析为 Java 对象
                    ObjectMapper mapper = new ObjectMapper();
                    Post post = mapper.readValue(resultJson, Post.class);
                    System.out.println("\n解析后的对象:");
                    System.out.println("ID: "