Of course! Here is a comprehensive guide on how to use JDBC with MySQL in Java, covering everything from setup to best practices.

What is JDBC?
JDBC (Java Database Connectivity) is an API (Application Programming Interface) that allows Java applications to interact with databases. It provides methods to query and update data in a database, and it works with any database that has a JDBC driver.
Step 1: Prerequisites
- Java Development Kit (JDK): Make sure you have JDK installed (version 8 or newer is recommended).
- MySQL Server: You need a running MySQL server instance.
- MySQL Database: Create a database for your application. You can do this via the MySQL command line or a GUI tool like MySQL Workbench.
CREATE DATABASE myapp_db;
- MySQL User and Privileges: Create a user and grant it privileges on your database.
CREATE USER 'javauser'@'localhost' IDENTIFIED BY 'securepassword';
GRANT ALL PRIVILEGES ON myapp_db.* TO 'javauser'@'localhost';
FLUSH PRIVILEGES;
Step 2: Add the MySQL JDBC Driver Dependency
To connect Java to MySQL, you need the official MySQL Connector/J driver. You have two main ways to add it to your project:
Option A: Using Maven (Recommended for most projects)
If you are using a build tool like Maven, add the mysql-connector-java dependency to your pom.xml file.
<dependencies>
    <!-- Other dependencies... -->
    <!-- MySQL Connector/J -->
    <dependency>
        <groupId>com.mysql</groupId>
        <artifactId>mysql-connector-j</artifactId>
        <version>8.0.33</version> <!-- Check for the latest version -->
    </dependency>
</dependencies>
Option B: Manual Download (For projects without a build tool)
- Go to the MySQL Connector/J Download Page.
- Download the platform independent ZIP archive.
- Extract the ZIP file.
- Find the JAR file (e.g.,
mysql-connector-j-8.0.33.jar). - Add this JAR file to your project's classpath. In an IDE like IntelliJ or Eclipse, you can do this by right-clicking your project -> Build Path / Libraries -> Add External JARs.
Step 3: JDBC Connection URL
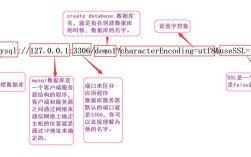
The connection URL is a special string that tells the JDBC driver which database to connect to. The format for MySQL is:

jdbc:mysql://[host][:port]/[database_name][?property1=value1&property2=value2]
host: The address of your MySQL server (e.g.,localhostor0.0.1).port: The port your MySQL server is running on (default is3306).database_name: The name of the database you want to connect to (e.g.,myapp_db).properties: Optional settings to configure the connection.
Common Properties:
useSSL=false: For local development, you might disable SSL (though it's recommended to usetruein production).useUnicode=true&characterEncoding=UTF-8: Ensures proper handling of characters.serverTimezone=UTC: Specifies the time zone for the server.
Example URL:
String url = "jdbc:mysql://localhost:3306/myapp_db?useSSL=false&serverTimezone=UTC";
Step 4: Writing the Java Code
The core of JDBC involves these key steps:
- Load the Driver: Register the MySQL driver with the JDBC DriverManager.
- Establish the Connection: Create a
Connectionobject using the URL, username, and password. - Create a Statement: Create a
StatementorPreparedStatementobject to execute SQL queries. - Execute the Query: Use the statement to run a SQL query (
SELECT) or update (INSERT,UPDATE,DELETE). - Process the Results: If it was a
SELECTquery, process the returnedResultSet. - Close Resources: Crucially, close the
ResultSet,Statement, andConnectionobjects in reverse order to free up resources.
Example 1: Simple SELECT Query
This example connects to the database, retrieves all users from a users table, and prints them.

import java.sql.Connection;
import java.sql.DriverManager;
import java.sql.ResultSet;
import java.sql.SQLException;
import java.sql.Statement;
public class JdbcSelectExample {
    // 1. Database connection details
    private static final String DB_URL = "jdbc:mysql://localhost:3306/myapp_db?useSSL=false&serverTimezone=UTC";
    private static final String USER = "javauser";
    private static final String PASS = "securepassword";
    public static void main(String[] args) {
        // Using try-with-resources to automatically close resources
        try (Connection conn = DriverManager.getConnection(DB_URL, USER, PASS);
             Statement stmt = conn.createStatement();
             ResultSet rs = stmt.executeQuery("SELECT id, username, email FROM users")) {
            // 2. Check if connection is successful
            if (conn != null) {
                System.out.println("Connected to the database successfully!");
            }
            // 3. Process the result set
            System.out.println("\n--- User List ---");
            while (rs.next()) {
                // Retrieve by column name is safer and more readable
                int id = rs.getInt("id");
                String username = rs.getString("username");
                String email = rs.getString("email");
                System.out.println("ID: " + id + ", Username: " + username + ", Email: " + email);
            }
        } catch (SQLException e) {
            System.err.println("Database connection or query failed!");
            e.printStackTrace();
        }
    }
}
Example 2: Using PreparedStatement for INSERT
Always use PreparedStatement for queries that take user input. It prevents SQL injection and is generally more efficient.
First, make sure you have a users table:
CREATE TABLE users (
    id INT AUTO_INCREMENT PRIMARY KEY,
    username VARCHAR(50) NOT NULL UNIQUE,
    email VARCHAR(100) NOT NULL UNIQUE
);
Now, the Java code to insert a new user:
import java.sql.Connection;
import java.sql.DriverManager;
import java.sql.PreparedStatement;
import java.sql.SQLException;
public class JdbcInsertExample {
    private static final String DB_URL = "jdbc:mysql://localhost:3306/myapp_db?useSSL=false&serverTimezone=UTC";
    private static final String USER = "javauser";
    private static final String PASS = "securepassword";
    public static void main(String[] args) {
        String sql = "INSERT INTO users (username, email) VALUES (?, ?)";
        // Using try-with-resources
        try (Connection conn = DriverManager.getConnection(DB_URL, USER, PASS);
             PreparedStatement pstmt = conn.prepareStatement(sql)) {
            // 2. Set parameters for the prepared statement
            pstmt.setString(1, "john_doe");
            pstmt.setString(2, "john.doe@example.com");
            // 3. Execute the update
            int rowsAffected = pstmt.executeUpdate();
            if (rowsAffected > 0) {
                System.out.println("A new user was inserted successfully!");
            }
        } catch (SQLException e) {
            System.err.println("Failed to insert user!");
            e.printStackTrace();
        }
    }
}
Step 5: Best Practices and Modern Alternatives
The try-with-resources Statement
The examples above use try-with-resources, which is a modern Java feature (since Java 7). It ensures that resources like Connection, Statement, and ResultSet are closed automatically, even if an exception occurs. This is highly recommended and should be your standard practice.
Connection Pooling
Creating a new database connection for every request is very slow and resource-intensive. In a real-world application, you should use a connection pool.
A connection pool maintains a cache of database connections that can be reused. Popular libraries include:
- HikariCP: Currently the best performing and most popular.
- Apache DBCP
- C3P0
Example with HikariCP:
<!-- Add HikariCP to your pom.xml -->
<dependency>
    <groupId>com.zaxxer</groupId>
    <artifactId>HikariCP</artifactId>
    <version>5.0.1</version> <!-- Check for the latest version -->
</dependency>
import com.zaxxer.hikari.HikariConfig;
import com.zaxxer.hikari.HikariDataSource;
import java.sql.Connection;
import java.sql.ResultSet;
import java.sql.Statement;
public class HikariCPExample {
    // 1. Create a HikariDataSource (this should be a singleton in your app)
    private static HikariDataSource dataSource;
    static {
        HikariConfig config = new HikariConfig();
        config.setJdbcUrl("jdbc:mysql://localhost:3306/myapp_db?useSSL=false&serverTimezone=UTC");
        config.setUsername("javauser");
        config.setPassword("securepassword");
        config.setDriverClassName("com.mysql.cj.jdbc.Driver"); // Explicitly set driver class
        dataSource = new HikariDataSource(config);
    }
    public static void main(String[] args) {
        // Get a connection from the pool
        try (Connection conn = dataSource.getConnection();
             Statement stmt = conn.createStatement();
             ResultSet rs = stmt.executeQuery("SELECT username FROM users")) {
            System.out.println("Connected to the database using a connection pool!");
            while (rs.next()) {
                System.out.println("Username: " + rs.getString("username"));
            }
        } catch (SQLException e) {
            e.printStackTrace();
        }
        // The connection is returned to the pool automatically when the try block exits
    }
}
Modern Alternatives to JDBC: JPA and Spring Data JPA
While JDBC is the foundation, writing raw SQL is tedious and error-prone. Modern applications often use higher-level abstractions:
- JPA (Java Persistence API): A specification for object-relational mapping (ORM). It allows you to map Java objects to database tables. You interact with your database through Java objects and JPA providers (like Hibernate) handle the SQL generation.
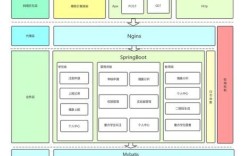
- Spring Data JPA: A layer on top of JPA that dramatically reduces boilerplate code. With simple interfaces, it can automatically create
CRUD(Create, Read, Update, Delete) methods for you.
For most new Spring Boot applications, Spring Data JPA is the recommended approach as it's far more productive and less error-prone than writing raw JDBC or even plain JPA.