Of course! This is a very common point of confusion for people starting with Selenium. Let's break it down clearly.

The Short Answer: You Don't Use Selenium IDE with Python
Selenium IDE is a Firefox/Chrome extension for recording and playing back tests. It does not generate Python code natively.
Think of it like this:
- Selenium IDE: A recording studio. You can easily "record" your actions by clicking around a website. It's fantastic for quickly creating a test script or learning how a test flows.
- Selenium with Python: A full-fledged orchestra. You write the "sheet music" (the Python code) to conduct the test with precision, logic, loops, and conditional statements.
The standard workflow is to use Selenium IDE to generate a test script, and then convert that script into Python code to be run with the Selenium WebDriver library.
The Recommended Workflow: IDE to Python
Here is the most effective way to leverage both tools.

Step 1: Record Your Test in Selenium IDE
- Install Selenium IDE: Get the extension from the Chrome Web Store or Firefox Add-ons.
- Open IDE and Start Recording: Click the record button and perform the actions you want to automate on a website.
- Example: Go to
google.com, type "Selenium" into the search box, and click the "Google Search" button.
- Example: Go to
- Stop Recording: Your actions are now captured as a series of commands in the IDE's left panel.
Step 2: Export the Test as Python Code
This is the crucial step that bridges the gap.
- In Selenium IDE, click the Project menu (or the three-dot menu in newer versions).
- Select Export.
- From the language dropdown, choose Python.
- Choose a Client Library. For Python, you'll want to use
selenium. - Click Export. This will download a
.pyfile to your computer.
Step 3: Understand the Exported Python Code
Let's look at the code generated for our simple Google search example.
# Generated by Selenium IDE
from selenium import webdriver
from selenium.webdriver.common.by import By
from selenium.webdriver.common.keys import Keys
from selenium.webdriver.support.ui import WebDriverWait
from selenium.webdriver.support import expected_conditions as EC
import time
driver = webdriver.Chrome() # Assumes ChromeDriver is in your PATH
driver.get("https://www.google.com/")
# This is a locator for the search box. IDE uses a complex CSS selector.
search_box = driver.find_element(By.NAME, "q")
search_box.send_keys("Selenium")
search_box.send_keys(Keys.RETURN)
# The IDE often includes an explicit wait. This is good practice!
try:
    # This waits up to 10 seconds for an element with the ID 'result-stats' to appear.
    WebDriverWait(driver, 10).until(
        EC.presence_of_element_located((By.ID, "result-stats"))
    )
    print("Page loaded successfully!")
except:
    print("Timed out waiting for page to load")
# It's good practice to close the driver when done.
# driver.quit()
Step 4: Set Up Your Python Environment and Run the Test
The exported code is a great starting point, but it needs a little setup to run.
- Install Python: If you don't have it, install Python from python.org.
- Install Selenium: Open your terminal or command prompt and install the Selenium library.
pip install selenium
- Install a WebDriver: Selenium needs a "driver" to control your browser. For Chrome, this is ChromeDriver.
- Easy Method (Recommended): Use a package manager like
webdriver-manager. This automatically downloads and manages the driver for you.pip install webdriver-manager
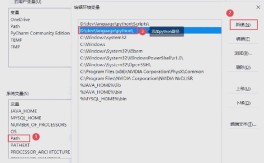
- Manual Method: Download the correct ChromeDriver version that matches your Chrome browser version from the official site. You'll need to set its location in your system's PATH or specify it in your script.
- Easy Method (Recommended): Use a package manager like
- Modify and Run the Script:
- If you used
webdriver-manager, you need to change the first few lines of your script. It's much simpler! - Let's update the script to use the manager.
- If you used
Here is the final, runnable Python script that uses the webdriver-manager library:

# --- MODIFIED SCRIPT USING WEBDRIVER-MANAGER ---
# Import necessary libraries
from selenium import webdriver
from selenium.webdriver.common.by import By
from selenium.webdriver.common.keys import Keys
from selenium.webdriver.chrome.service import Service as ChromeService
from webdriver_manager.chrome import ChromeDriverManager
from selenium.webdriver.support.ui import WebDriverWait
from selenium.webdriver.support import expected_conditions as EC
# --- Setup ---
# Use webdriver-manager to automatically handle the driver
driver = webdriver.Chrome(service=ChromeService(ChromeDriverManager().install()))
# --- Test Steps ---
try:
    # 1. Open the target URL
    driver.get("https://www.google.com/")
    # 2. Find the search box element and enter text
    # We use a more robust locator strategy: By.NAME
    search_box = driver.find_element(By.NAME, "q")
    search_box.send_keys("Selenium")
    search_box.send_keys(Keys.RETURN)
    # 3. Wait for the results page to load
    # This is an explicit wait, which is much better than a fixed 'time.sleep()'
    # It waits for a specific element to be visible on the page.
    WebDriverWait(driver, 10).until(
        EC.presence_of_element_located((By.ID, "result-stats"))
    )
    print("Test Passed: Search results page loaded successfully.")
    # (Optional) Get the page title for verification
    print(f"Page Title is: {driver.title}")
except Exception as e:
    print(f"Test Failed: {e}")
finally:
    # 4. Clean up - close the browser window
    # This block runs whether the test passed or failed
    print("Closing the browser.")
    driver.quit()
To run this, save it as a file (e.g., google_test.py) and execute it from your terminal:
python google_test.py
You will see a Chrome window open, perform the search, and then close.
Why Not Just Use Selenium IDE for Everything?
While IDE is great for simple recording, it has major limitations that Python solves:
| Feature | Selenium IDE | Selenium with Python |
|---|---|---|
| Language | JavaScript | Python, Java, C#, Ruby, JavaScript |
| Logic | Very limited. No loops, conditionals, or complex data handling. | Full programming power. Use if/else, for/while loops, functions, classes, and libraries. |
| Data Handling | Hard-coded values. | Easy data-driven testing using CSV, Excel, or databases. |
| Reporting | Basic HTML report. | Professional reporting with libraries like Allure or pytest-html. |
| Integration | Standalone tool. | Integrates with CI/CD (Jenkins, GitHub Actions), test runners (pytest, unittest), and other DevOps tools. |
| Maintenance | Brittle. A small UI change can break a recorded test. | Robust and maintainable. Use locators (like IDs) that are less likely to break and write reusable functions. |
Conclusion
Use Selenium IDE as a tool for rapid prototyping and learning. Record your user flows to get a quick skeleton of your test.
Then, export that test to Python and build upon it. This gives you the best of both worlds: the speed of recording and the power, flexibility, and maintainability of a real programming language.