Of course! Here is a comprehensive guide to working with ONVIF services in Python, covering the most popular libraries, practical examples, and best practices.
What is ONVIF?
ONVIF (Open Network Video Interface Forum) is a global standardization forum for the IP-based physical security industry. Its goal is to create a standardized communication protocol between IP cameras, video management systems (VMS), and other security devices.
For a Python developer, this means you can programmatically discover, control, and get data from a wide variety of IP cameras from different manufacturers (like Hikvision, Axis, Dahua, etc.) without needing to know each one's proprietary API.
Key Python Libraries for ONVIF
There are two main libraries you'll encounter. The choice depends on your needs: simplicity vs. raw power.
onvif-zeep(Recommended for most users): This is a high-level, easy-to-use wrapper. It abstracts away the complexities of SOAP and WSDL, allowing you to interact with the camera using simple Python objects and methods. It's the best place to start.onvif(The original library): This is a lower-level library that provides more direct access to the ONVIF services. It's more complex to use but gives you finer control. It's the predecessor toonvif-zeep.
We will focus primarily on onvif-zeep as it's the modern, more user-friendly choice.
Step 1: Installation
First, you need to install the library. It's recommended to do this in a virtual environment.
pip install onvif-zeep
Note: onvif-zeep depends on zeep for SOAP communication. If you run into issues, you might need to install it explicitly:
pip install zeep

Step 2: Discovering ONVIF Devices
Before you can connect to a camera, you need to find it on the network. ONVIF devices use a special network protocol called WS-Discovery for this.
The onvif-zeep library doesn't have a built-in discovery tool, but you can use a simple script with Python's built-in libraries or use a dedicated discovery script.

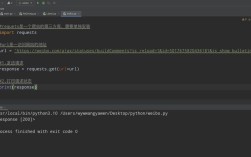
Here is a simple discovery script using socket and requests:
# onvif_discovery.py
import socket
import requests
from xml.etree import ElementTree as ET
# The multicast address for WS-Discovery
MULTICAST_ADDRESS = "239.255.255.250"
PORT = 3702
def discover_onvif_devices(timeout=5):
    """
    Discovers ONVIF devices on the network using WS-Discovery.
    """
    # Create a UDP socket
    sock = socket.socket(socket.AF_INET, socket.SOCK_DGRAM, socket.IPPROTO_UDP)
    sock.setsockopt(socket.SOL_SOCKET, socket.SO_REUSEADDR, 1)
    sock.bind(('', 0))
    sock.settimeout(timeout)
    # Set the TTL (Time To Live) for the packet
    sock.setsockopt(socket.IPPROTO_IP, socket.IP_MULTICAST_TTL, 2)
    # Send the WS-Discovery probe message
    probe_message = (
        '<?xml version="1.0" encoding="UTF-8"?>'
        '<s:Envelope xmlns:s="http://www.w3.org/2003/05/soap-envelope">'
        '  <s:Header>'
        '    <d:Probe xmlns:d="http://schemas.xmlsoap.org/ws/2005/04/discovery" '
        '            xmlns:dn="http://schemas.xmlsoap.org/ws/2005/04/discovery">'
        '      <d:Types>dn:NetworkVideoTransmitter</d:Types>'
        '    </d:Probe>'
        '  </s:Header>'
        '</s:Envelope>'
    ).encode('utf-8')
    sock.sendto(probe_message, (MULTICAST_ADDRESS, PORT))
    print("Sent probe message. Waiting for responses...")
    found_devices = []
    try:
        while True:
            data, addr = sock.recvfrom(2048)
            print(f"Received response from {addr[0]}")
            # Parse the SOAP response to get the XAddrs
            root = ET.fromstring(data)
            # The XAddrs can be found in a specific path in the SOAP response
            # This path can vary slightly, so we use a more robust search
            body = root.find('.//{http://www.w3.org/2003/05/soap-envelope}Body')
            if body is not None:
                probe_matches = body.findall('.//{http://schemas.xmlsoap.org/ws/2005/04/discovery}ProbeMatch')
                for match in probe_matches:
                    xaddrs_elem = match.find('.//{http://schemas.xmlsoap.org/ws/2005/04/discovery}XAddrs')
                    if xaddrs_elem is not None and xaddrs_elem.text:
                        xaddrs = xaddrs_elem.text.strip().split()
                        for xaddr in xaddrs:
                            # The XAddr is the base URL for the ONVIF services
                            found_devices.append({
                                'ip': addr[0],
                                'xaddr': xaddr
                            })
    except socket.timeout:
        print("Discovery finished.")
    finally:
        sock.close()
    return found_devices
if __name__ == "__main__":
    devices = discover_onvif_devices()
    for device in devices:
        print(f"Found device at IP: {device['ip']}, XAddr: {device['xaddr']}")
Step 3: Connecting to a Camera and Using Services
Once you have the camera's IP address and its ONVIF endpoint (the XAddr), you can connect to it.
The main ONVIF services you'll interact with are:
- Device Service: Get camera information, manage users, get system date/time.
- Media Service: Get video streams, get/imagine profiles (resolutions, codecs), control PTZ (Pan-Tilt-Zoom).
- PTZ Service: Control the camera's movement.
Here is a complete, practical example that connects to a camera and performs common actions.
# onvif_client_example.py
import onvif
from onvif import ONVIFService
import time
# --- Configuration ---
# Replace with your camera's details
CAMERA_IP = '192.168.1.100'       # Camera's IP address
CAMERA_PORT = 8080                # ONVIF port (often 80 or 8080)
USERNAME = 'admin'                # Camera username
PASSWORD = 'password'             # Camera password
def main():
    print("Connecting to ONVIF device...")
    # 1. Create an ONVIF device object
    # This object is the entry point for all services
    device = onvif.ONVIFDevice(
        host=CAMERA_IP,
        port=CAMERA_PORT,
        username=USERNAME,
        password=PASSWORD
    )
    try:
        # 2. Pull device information and create services
        # This is a crucial step that fetches the device's capabilities
        # and creates the service objects (Media, PTZ, Device).
        device.update_xaddrs()
        print("Device XAddr updated.")
        # Create service objects
        media_service = device.create_media_service()
        ptz_service = device.create_ptz_service()
        device_service = device.create_device_service()
    except Exception as e:
        print(f"Error connecting to device: {e}")
        print("Please check the IP, port, username, and password.")
        print("Also, ensure the camera supports ONVIF and it's enabled.")
        return
    # --- Using the Device Service ---
    print("\n--- Device Service Info ---")
    try:
        # Get device information
        device_info = device_service.GetDeviceInformation()
        print(f"Manufacturer: {device_info['Manufacturer']}")
        print(f"Model: {device_info['Model']}")
        print(f"Firmware Version: {device_info['FirmwareVersion']}")
        print(f"Serial Number: {device_info['SerialNumber']}")
    except Exception as e:
        print(f"Could not get device info: {e}")
    # --- Using the Media Service ---
    print("\n--- Media Service Info ---")
    try:
        # Get all video streams (profiles)
        profiles = media_service.GetProfiles()
        if not profiles:
            print("No media profiles found.")
            return
        # Use the first profile for this example
        profile_token = profiles[0].token
        print(f"Using media profile token: {profile_token}")
        # Get the video stream URI (RTSP)
        stream_uri = media_service.GetStreamUri({'StreamSetup': {'Stream': 'RTP-Unicast', 'Transport': {'Protocol': 'RTSP'}}, 'ProfileToken': profile_token})
        print(f"RTSP Stream URI: {stream_uri['Uri']}")
        print("You can play this stream in VLC: vlc <rtsp_uri>")
        # Get imaging (resolution, brightness, etc.) settings
        imaging_settings = media_service.GetImagingSettings({'ProfileToken': profile_token})
        print(f"Current Brightness: {imaging_settings['Brightness']}")
    except Exception as e: