Of course! The python-openstackclient is the official command-line interface (CLI) for interacting with OpenStack. It's a powerful and essential tool for anyone working with OpenStack clouds.

Here’s a comprehensive guide covering what it is, how to install it, and how to use it effectively.
What is python-openstackclient?
It's a unified command-line tool that replaces a dozen or more older, separate tools (like nova, glance, keystone, etc.). It provides a single entry point, openstack, to manage all major OpenStack services.
Key Advantages:
- Unified: One command for everything.
- Consistent: All commands follow a similar structure (
openstack <service> <action> <options>). - Extensible: It uses plugins, so when a new OpenStack service is added, a new plugin is often released for the CLI.
- Powerful: Supports complex operations, scripting, and JSON output for automation.
Installation and Setup
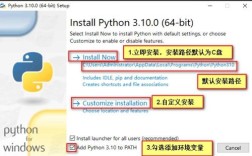
Prerequisites
You need Python installed on your system. It's highly recommended to use a Python virtual environment to manage dependencies.

# Create and activate a virtual environment (optional but recommended)
python3 -m venv openstack-venv
source openstack-venv/bin/activate
# Upgrade pip
pip install --upgrade pip
Installation
Install the client and its common dependencies using pip.
pip install python-openstackclient
Configuration (The Most Important Step)
The openstack client needs to know where your OpenStack cloud is and how to authenticate. This is done using a configuration file, typically located at ~/.config/openstack/clouds.yaml.
Example clouds.yaml:
clouds:
  # Define your cloud's details
  my-openstack-cloud:
    auth:
      auth_url: https://identity.example.com:5000/v3
      username: 'your_username'
      password: 'your_password'
      project_name: 'my_project_name'
      project_domain_name: 'Default'
      user_domain_name: 'Default'
      # For projects with a project ID instead of name:
      # project_id: 'a1b2c3d4-e5f6-7890-1234-abcdef123456'
    region_name: 'RegionOne'
    interface: 'public'
    identity_api_version: 3
  # You can define multiple clouds and switch between them
  dev-cloud:
    auth:
      auth_url: https://dev-identity.example.com:5000/v3
      username: 'dev_user'
      password: 'dev_pass'
      project_name: 'dev_project'
      project_domain_name: 'Default'
      user_domain_name: 'Default'
    region_name: 'RegionOne'
Using Environment Variables: You can also set credentials using environment variables, which is useful for CI/CD or temporary sessions.

export OS_AUTH_URL=https://identity.example.com:5000/v3
export OS_PROJECT_ID=<your_project_id>
export OS_PROJECT_NAME="<your_project_name>"
export OS_USER_DOMAIN_NAME="Default"
export OS_USERNAME="<your_username>"
export OS_PASSWORD="<your_password>"
export OS_REGION_NAME="RegionOne"
export OS_INTERFACE=public
export OS_IDENTITY_API_VERSION=3
Basic Usage and Common Commands
The general syntax is:
openstack <service> <command> <options>
A. Authentication & Cloud Management
First, you need to authenticate to get a token. The client does this automatically on the first command.
# List available clouds defined in your clouds.yaml
openstack catalog list
# Get a token and set the active cloud
openstack --os-cloud my-openstack-cloud token issue
# Set the active cloud for the current terminal session
export OS_CLOUD=my-openstack-cloud
B. Compute (Nova) - Managing Servers
# List all servers (VMs)
openstack server list
# Create a new server (VM)
# You need an image (e.g., 'ubuntu-22.04') and a flavor (e.g., 'm1.small')
openstack server create --flavor m1.small --image ubuntu-22.04 --security-group default --key-name my-key-pair my-test-vm
# Get detailed info about a server
openstack server show my-test-vm
# Get a VNC console for a server
openstack console url show my-test-vm
# Delete a server
openstack server delete my-test-vm
C. Networking (Neutron) - Managing Networks, Ports, etc.
# List networks
openstack network list
# Create a private network
openstack network create private-net
# Create a subnet for that network
openstack subnet create --network private-net --subnet-range 192.168.100.0/24 --dns 8.8.8.8 my-subnet
# List routers
openstack router list
# Create a router and attach it to the external network (e.g., 'public')
openstack router create my-router
openstack router add subnet my-router my-subnet
openstack router set --external-gateway public my-router
# List security groups
openstack security group list
# Add a rule to allow SSH (port 22)
openstack security group rule create --proto tcp --dst-port 22 --remote-ip 0.0.0.0/0 default
D. Image (Glance) - Managing Disk Images
# List available images
openstack image list
# Upload a new image (e.g., a QCOW2 file)
openstack image create --file ubuntu-22.04.qcow2 --disk-format qcow2 --public my-custom-image
# Delete an image
openstack image delete my-custom-image
E. Block Storage (Cinder) - Managing Volumes
# List available volumes
openstack volume list
# Create a new 100GB volume
openstack volume create --size 100 my-new-volume
# Attach a volume to a server
openstack server add volume my-test-vm my-new-volume --device /dev/vdb
# Detach a volume
openstack server remove volume my-test-vm my-new-volume
F. Identity (Keystone) - Managing Users, Projects, Roles
# List users
openstack user list
# List projects (also called tenants)
openstack project list
# List roles
openstack role list
# Create a new user
openstack user create --password-prompt --project my_project_name --user-domain Default --project-domain Default new_user
# Grant a role to a user on a project
openstack role add --project my_project_name --user new_user member
Advanced Usage
A. Using JSON for Automation
For scripting, JSON output is extremely useful. You can then parse the JSON with tools like jq.
# Get server list in JSON format
openstack server list -f json
# Get the ID of a specific server using jq
SERVER_ID=$(openstack server show my-test-vm -f value -c id)
echo "Server ID is: $SERVER_ID"
B. Pagination
For long lists, you can use --limit and --marker.
# List the first 5 servers
openstack server list --limit 5
# List the next 5 servers after the one with ID '12345'
openstack server list --marker 12345 --limit 5
C. Using Environment Files
For complex commands, you can put all your options into a file. This is great for creating servers with many custom properties.
create-vm-env.txt:
--flavor m1.large
--image ubuntu-22.04
--nic net-id=private-net
--key-name my-key-pair
--property description="My important VM"
--user-data cloud-init.txt
Command:
openstack server create --env-file create-vm-env.txt my-important-vm
Getting Help
The openstack client has excellent built-in help.
# Get general help
openstack --help
# Get help for a specific service (e.g., compute)
openstack server --help
# Get help for a specific command
openstack server create --help
Summary
| Task | Command Example |
|---|---|
| List servers | openstack server list |
| Create server | openstack server create --flavor m1.tiny --image cirros-0.4.0 my-vm |
| List networks | openstack network list |
| Create network | openstack network create my-net |
| List images | openstack image list |
| List volumes | openstack volume list |
| List users | openstack user list |
| Show help | openstack <command> --help |