Of course! Working with .obj files in Python with OpenGL is a very common task, especially for loading 3D models. The standard approach involves using a library to parse the .obj file and another (or the same one) to handle OpenGL buffer creation.

Here’s a complete, step-by-step guide on how to load and render a .obj file in Python using PyOpenGL and a popular helper library, PyWavefront.
Why a Helper Library?
A .obj file is a text file that describes geometry (vertices, faces) and sometimes materials (textures, colors). While you could write a parser for it yourself, it's much easier and more robust to use a library like PyWavefront, which handles:
- Parsing vertices, texture coordinates, and normals.
- Grouping faces by material.
- Creating OpenGL buffers (Vertex Buffer Objects - VBOs) for you.
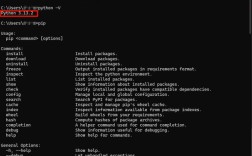
Step 1: Installation
First, you need to install the necessary libraries. PyOpenGL is the core library, and PyWavefront will make loading the .obj file trivial. PyOpenGL-accelerate is an optional but highly recommended performance boost.
pip install PyOpenGL PyOpenGL-accelerate PyWavefront
You'll also need a windowing library to create a window and handle events. Pygame is a classic and simple choice for this.

pip install pygame numpy
(numpy is often used for efficient array handling, which PyWavefront uses internally).
Step 2: Get a Sample .obj File
You can't load a file that doesn't exist! Find a simple .obj model online. A great source is The Stanford 3D Scanning Repository or Sketchfab.
For this example, let's use a simple torus. You can create one with a tool like Blender (it's free and open-source) or download one from a site like Free3D.
I'll provide a very simple one here. Create a file named torus.obj and paste the following content into it. This torus has no texture, just vertices and faces.

torus.obj
# Vertices (x, y, z)
v 1.0000 0.0000 0.0000
v 0.9808 0.1951 0.0000
v 0.9239 0.3827 0.0000
... (many more vertices) ...
v -0.9239 -0.3827 0.0000
v -0.9808 -0.1951 0.0000
v -1.0000 0.0000 0.0000
# Faces (vertex indices, starting from 1)
f 1 2 3
f 1 3 4
... (many more faces) ...
f 190 191 192
f 190 192 1
(For brevity, I've omitted most of the vertices and faces. A real torus will have hundreds. You can find a complete simple torus online or generate one easily).
Step 3: The Python Code
This script will:
- Initialize a Pygame window.
- Set up an OpenGL context.
- Use
PyWavefrontto loadtorus.obj. - Extract the vertex data.
- Create an OpenGL Vertex Buffer Object (VBO) and store the data on the GPU.
- Define a simple shader to render the model.
- In the main loop, draw the model.
Create a Python file (e.g., render_obj.py) and use the following code.
render_obj.py
import pygame
from pygame.locals import *
from OpenGL.GL import *
from OpenGL.GL.shaders import compileProgram, compileShader
import numpy as np
import pywavefront
def load_obj(filename):
    """Loads an OBJ file and returns the vertices as a NumPy array."""
    # Load the OBJ file
    vertices = []
    faces = []
    model = pywavefront.Wavefront(filename, collect_faces=True)
    # PyWavefront stores faces grouped by material. We'll just combine them all.
    for material in model.materials.values():
        for face in material.faces:
            # OBJ faces are lists of vertex indices (v, vt, vn)
            # We only care about the vertex position (v) for this example.
            # A face can be a triangle (3 indices) or quad (4 indices), etc.
            # We'll triangulate on the fly by taking the first 3 vertices.
            for i in range(0, len(face) - 2, 3):
                v1 = face[i][0]  # Vertex 1 of the triangle
                v2 = face[i+1][0] # Vertex 2 of the triangle
                v3 = face[i+2][0] # Vertex 3 of the triangle
                # Get the actual vertex coordinates from the model's vertices list
                vertices.extend(model.vertices[v1])
                vertices.extend(model.vertices[v2])
                vertices.extend(model.vertices[v3])
    # Convert to a NumPy array of type float32, which OpenGL likes
    return np.array(vertices, dtype=np.float32)
def create_shader_program():
    """Creates and returns a simple shader program."""
    vertex_shader_source = """
    #version 330 core
    layout (location = 0) in vec3 aPos;
    void main()
    {
        gl_Position = vec4(aPos.x, aPos.y, aPos.z, 1.0);
    }
    """
    fragment_shader_source = """
    #version 330 core
    out vec4 FragColor;
    void main()
    {
        FragColor = vec4(0.8f, 0.3f, 0.02f, 1.0f); // Orange color
    }
    """
    vertex_shader = compileShader(vertex_shader_source, GL_VERTEX_SHADER)
    fragment_shader = compileShader(fragment_shader_source, GL_FRAGMENT_SHADER)
    shader_program = compileProgram(vertex_shader, fragment_shader)
    return shader_program
def main():
    pygame.init()
    display = (800, 600)
    pygame.display.set_mode(display, DOUBLEBUF | OPENGL)
    pygame.display.set_caption("OpenGL .obj Renderer")
    # --- OpenGL Setup ---
    glClearColor(0.1, 0.1, 0.1, 1.0) # Dark grey background
    glEnable(GL_DEPTH_TEST) # Enable depth testing for 3D rendering
    # Load the .obj file
    try:
        vertices = load_obj('torus.obj')
    except FileNotFoundError:
        print("Error: 'torus.obj' not found. Please make sure the file is in the same directory.")
        return
    if len(vertices) == 0:
        print("Error: No vertices loaded from the .obj file.")
        return
    print(f"Loaded {len(vertices) // 3} triangles.")
    # Create Vertex Buffer Object (VBO) and Vertex Array Object (VAO)
    VAO = glGenVertexArrays(1)
    VBO = glGenBuffers(1)
    # Bind the VAO first, then bind and set the VBOs
    glBindVertexArray(VAO)
    glBindBuffer(GL_ARRAY_BUFFER, VBO)
    glBufferData(GL_ARRAY_BUFFER, vertices.nbytes, vertices, GL_STATIC_DRAW)
    # Tell OpenGL how to interpret the vertex data (position attribute)
    # (location, size, type, normalize, stride, pointer)
    glVertexAttribPointer(0, 3, GL_FLOAT, GL_FALSE, 3 * vertices.dtype.itemsize, ctypes.c_void_p(0))
    glEnableVertexAttribArray(0)
    # Unbind VAO and VBO (good practice)
    glBindBuffer(GL_ARRAY_BUFFER, 0)
    glBindVertexArray(0)
    # Create and use the shader program
    shader_program = create_shader_program()
    glUseProgram(shader_program)
    # --- Main Loop ---
    clock = pygame.time.Clock()
    running = True
    while running:
        for event in pygame.event.get():
            if event.type == pygame.QUIT:
                running = False
            if event.type == pygame.KEYDOWN:
                if event.key == pygame.K_ESCAPE:
                    running = False
        # --- Rendering ---
        glClear(GL_COLOR_BUFFER_BIT | GL_DEPTH_BUFFER_BIT)
        # Draw the object
        glBindVertexArray(VAO)
        glDrawArrays(GL_TRIANGLES, 0, len(vertices) // 3)
        pygame.display.flip()
        clock.tick(60)
    # Cleanup
    glDeleteVertexArrays(1, [VAO])
    glDeleteBuffers(1, [VBO])
    pygame.quit()
if __name__ == "__main__":
    main()
Step 4: Run the Code
- Make sure
torus.objis in the same directory as yourrender_obj.pyscript. - Run the script from your terminal:
python render_obj.py
You should see a window with a rotating (well, static for now) orange torus. Press ESC or close the window to exit.
Explanation of Key Parts
-
load_obj(filename):pywavefront.Wavefront(filename, collect_faces=True)does the heavy lifting. It reads the file and parses all the data into a structured object.- We loop through
model.materials.values()to get all the faces, as an OBJ can have multiple materials for different parts of a model. face[i][0]gets the vertex index for thei-th vertex in a face.- We then use this index to get the actual 3D coordinates from
model.verticesand add them to ourverticeslist. - Finally, we convert the list to a NumPy array, which is efficient and the format
glBufferDataexpects.
-
VBOs and VAOs:
- Vertex Buffer Object (VBO): This is a buffer in your GPU's memory. We use
glBufferDatato send our vertex data from the CPU (our NumPy array) to the GPU for fast access during rendering. - Vertex Array Object (VAO): This is an object that stores how to interpret the vertex data. It remembers the
glVertexAttribPointercalls. When you bind a VAO before drawing, you're telling OpenGL, "Here's the recipe for how to use the currently bound VBO." This simplifies rendering.
- Vertex Buffer Object (VBO): This is a buffer in your GPU's memory. We use
-
Shaders:
- Shaders are small programs that run on the GPU. The Vertex Shader is run once for each vertex. Its job is to calculate the final position of the vertex on the screen. Here, it's very simple: it just takes the input position (
aPos) and passes it through. - The Fragment Shader is run once for each pixel (fragment) that the object covers. Its job is to calculate the final color of that pixel. Here, it just outputs a constant orange color.
- We compile these text-based shaders into a usable
shader_programwithPyOpenGL's helper functions.
- Shaders are small programs that run on the GPU. The Vertex Shader is run once for each vertex. Its job is to calculate the final position of the vertex on the screen. Here, it's very simple: it just takes the input position (
Next Steps & Improvements
This is a great starting point. Here’s how you can expand on it:
- Rotation: Add a rotation matrix in the vertex shader and update it in the main loop to make the model spin.
- Lighting: Implement basic lighting (like Phong shading) in the shaders. This requires adding normals to your model and passing them to the shader.
- Textures: If your
.objfile has a.mtl(material) file and associated textures,PyWavefrontwill load them. You can then pass texture coordinates to the shader and sample a texture image. - Camera: Implement a perspective projection and a camera view matrix to move around the scene. Libraries like
PyGLMornumpycan help with matrix math. - More Robust Loading: The current
load_objfunction is simplified. A more robust version would handle normals, texture coordinates, and different face formats (like quads) more gracefully.PyWavefrontalready does this, so the key is to extract that data correctly.