Of course! When people talk about "region" in the context of Python and OpenCV, they are almost always referring to a Region of Interest (ROI).

An ROI is simply a rectangular area within an image that you want to process separately from the rest of the image. This is a fundamental and powerful concept in image processing.
Here's a complete guide covering:
- What is an ROI? (The Concept)
- How to Define and Use an ROI (The Code)
- Common Use Cases
- Important Considerations (Masking vs. Cropping)
What is a Region of Interest (ROI)?
Imagine you have a photo of a person in a park. If you only want to analyze the person's face, the face is your ROI. You can then apply filters, detect features, or perform other operations only on that face, leaving the rest of the image (the park) untouched.
In OpenCV, an ROI is defined by its coordinates and dimensions:

- (x, y): The top-left corner of the rectangle.
- (width, height): The width and height of the rectangle.
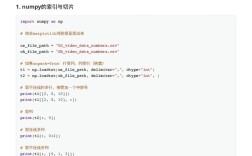
You create an ROI by "slicing" the main image array using NumPy notation: image[y:y+height, x:x+width].
How to Define and Use an ROI (with Code)
Let's walk through a practical example.
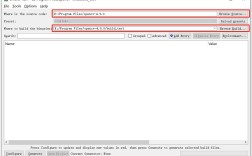
Setup: Install OpenCV
If you haven't already, install the library:
pip install opencv-python
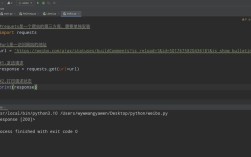
Example 1: Copying and Pasting an ROI
This is the most basic operation. We'll cut a rectangle from one part of an image and paste it into another.

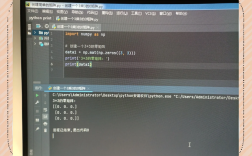
import cv2
import numpy as np
# Load an image
# Make sure you have an image file named 'lena.png' or provide your own path
image = cv2.imread('lena.png')
# Check if the image was loaded successfully
if image is None:
    print("Error: Could not load image. Check the file path.")
    exit()
# --- Define the ROI ---
# Let's select a rectangular region from the top-left corner
# (x, y) = (50, 50)
# width = 200, height = 200
x, y, w, h = 50, 50, 200, 200
roi = image[y:y+h, x:x+w]
# --- Modify the original image using the ROI ---
# Let's place the ROI in the bottom-right corner of the image
# The coordinates for the new location are (300, 300)
image[300:300+h, 300:300+w] = roi
# Display the original image with the ROI copied
cv2.imshow('Image with ROI copied', image)
# Wait for a key press to close the window
cv2.waitKey(0)
cv2.destroyAllWindows()
Example 2: Processing an ROI (e.g., Applying a Filter)
Here, we'll select an ROI, apply a Gaussian blur to it, and then place the blurred version back into the original image.
import cv2
import numpy as np
# Load an image
image = cv2.imread('lena.png')
if image is None:
    print("Error: Could not load image.")
    exit()
# --- Define the ROI ---
# Let's select a region in the center of the image
h, w = image.shape[:2]
# Define ROI as a square in the middle
roi_size = 150
x = (w - roi_size) // 2
y = (h - roi_size) // 2
roi = image[y:y+roi_size, x:x+roi_size]
# --- Process the ROI ---
# Apply a Gaussian blur to the selected region
# The (51, 51) is the kernel size. It must be positive and odd.
blurred_roi = cv2.GaussianBlur(roi, (51, 51), 0)
# --- Replace the original ROI with the processed one ---
image[y:y+roi_size, x:x+roi_size] = blurred_roi
# Display the result
cv2.imshow('Blurred ROI', image)
cv2.waitKey(0)
cv2.destroyAllWindows()
Common Use Cases for ROI
Using ROIs is a cornerstone of many computer vision tasks.
-
Object Tracking: Once an object is detected in the first frame, you can define an ROI around it. In subsequent frames, you only need to search for the object within that small ROI, which makes tracking much faster and more robust.
-
Face Detection & Recognition: After a face detector (like Haar Cascades or a DNN) finds a face, you extract the face region (the ROI) and feed it into a separate recognition model.
-
Template Matching: You want to find a small template image within a larger image. The algorithm slides the template across the large image, checking for matches. The ROI concept is fundamental to this sliding window approach.
-
Selective Image Processing: As shown in the example above, you might want to blur a license plate, sharpen text, or change the color of a specific object without affecting the rest of the image.
-
Data Augmentation: In machine learning, you can create new training data by cropping random ROIs from your existing images.
Important Considerations: Masking vs. Cropping
This is a crucial distinction for beginners.
Cropping (Using Rectangular Slicing)
This is what we've done so far. It's a simple array slice.
roi = image[y:y+h, x:x+w]
- Pros: Very fast and simple.
- Cons: Only works for rectangular regions. What if you want to select a person, a car, or an irregular shape? A rectangle would include a lot of unwanted background.
Masking (Using a Pixel-Wise "Stencil")
Masking allows you to select non-rectangular, irregularly shaped regions. A "mask" is a black and white image (a NumPy array) of the same size as your original image.
- White pixels (255) in the mask indicate which pixels from the original image to keep.
- Black pixels (0) in the mask indicate which pixels to discard.
How to create a mask? You can create one manually or, more commonly, generate it programmatically (e.g., by thresholding an image or using a segmentation algorithm).
Example: Masking a Circular ROI
import cv2
import numpy as np
# Load an image
image = cv2.imread('lena.png')
if image is None:
    print("Error: Could not load image.")
    exit()
# --- Create a Circular Mask ---
h, w = image.shape[:2]
# Create a black mask of the same size as the image
mask = np.zeros((h, w), dtype=np.uint8)
# Define the circle's center and radius
center = (w // 2, h // 2) # Center of the image
radius = 100
# Draw a white filled circle on the black mask
cv2.circle(mask, center, radius, (255), -1) # -1 means fill the circle
# --- Apply the Mask ---
# The '&' operator performs a bitwise AND.
# It keeps a pixel only if both the original image and the mask have a non-zero value there.
# The result is a 3-channel image, so we need to stack the single-channel mask 3 times.
mask_3channel = cv2.merge([mask, mask, mask])
masked_image = image & mask_3channel # Bitwise AND
# --- Display the Results ---
cv2.imshow('Original Image', image)
cv2.imshow('Mask (Black and White)', mask)
cv2.imshow('Masked Image (Circular ROI)', masked_image)
cv2.waitKey(0)
cv2.destroyAllWindows()
| Cropping (Rectangular Slice) | Masking (Pixel-Wise) |
|---|---|
roi = image[y:y+h, x:x+w] |
masked_image = image & mask_3channel |
| Use Case: Simple rectangles, fast processing. | Use Case: Irregular shapes, precise selection. |
| Drawback: Includes unwanted background. | Drawback: More complex to create the mask. |
Summary
| Concept | Description | Code Example |
|---|---|---|
| Region of Interest (ROI) | A specific part of an image you want to work with. | N/A |
| Rectangular ROI (Cropping) | Selecting a rectangle using NumPy slicing. | roi = image[100:300, 50:250] |
| Non-Rectangular ROI (Masking) | Selecting an arbitrary shape using a black & white mask. | masked_img = cv2.bitwise_and(img, img, mask=mask) |
| Use Case | Object tracking, face processing, selective filtering, data augmentation. | N/A |
Mastering ROIs is essential for moving from basic image manipulation to more advanced and practical computer vision applications.