目录
- 核心概念简介
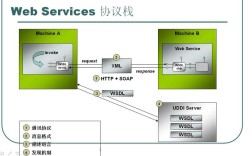
- 什么是 WebService?
- 主要协议:SOAP vs. REST
- 使用 JAX-WS (Java API for XML Web Services) - 官方标准
- 1 客户端调用方式一:
wsimport命令生成客户端代码 - 2 客户端调用方式二:动态调用
DispatchAPI (无需生成代码) - 3 服务端发布方式:使用
Endpoint类
- 1 客户端调用方式一:
- 使用 Apache CXF - 强大的开源框架
- 1 生成客户端 (与 JAX-WS 类似)
- 2 使用 Spring 集成 CXF
- 使用 Spring Boot Starter 简化开发
- 1 添加依赖
- 2 配置和调用
- 访问 RESTful WebService (基于 HTTP/JSON)
- 1 使用
RestTemplate(Spring 传统方式) - 2 使用
WebClient(Spring Reactive/推荐方式)
- 1 使用
- 总结与对比
核心概念简介
什么是 WebService?
WebService 是一种跨编程语言和跨操作系统平台的远程调用技术,它使得不同系统(如 Java 应用和 .NET 应用)能够通过网络进行通信和数据交换。

主要协议:SOAP vs. REST
| 特性 | SOAP (Simple Object Access Protocol) | REST (Representational State Transfer) |
|---|---|---|
| 协议 | 严格基于 XML,通常通过 HTTP/SMTP 传输。 | 基于 HTTP 协议本身,没有严格的规范。 |
| 格式 | 强制使用 XML。 | 灵活,常用 JSON,也支持 XML、HTML 等。 |
| 标准 | 有严格的官方标准(WSDL, SOAP, WS-*)。 | 架构风格,无官方标准。 |
| 性能 | 消息体积大,解析慢,性能相对较低。 | 消息体积小(尤其是 JSON),解析快,性能高。 |
| 安全性 | 内置强大的安全标准和事务支持。 | 安全性依赖于 HTTP 标准(如 OAuth, HTTPS)。 |
| 使用场景 | 企业级应用、金融、电信等对安全性、事务性要求高的场景。 | 公开 API、移动应用后端、微服务架构等。 |
本文重点:
- SOAP WebService:主要使用 JAX-WS 和 Apache CXF。
- RESTful WebService:主要使用 Spring Boot 的
RestTemplate和WebClient。
方法一:使用 JAX-WS (Java API for XML Web Services)
JAX-WS 是 Java 官方提供的用于创建和调用 SOAP WebService 的 API,它是 Java EE 的一部分,现在也包含在 Jakarta EE 中。
1 客户端调用方式一:wsimport 命令生成客户端代码
这是最传统、最经典的方式,通过一个工具根据 WSDL (Web Service Description Language) 文件自动生成客户端调用代码。
步骤:

-
获取 WSDL 文件地址 一个公共的天气查询服务 WSDL 地址:
http://ws.webxml.com.cn/WebServices/WeatherWS.asmx?wsdl -
使用
wsimport生成代码 打开命令行,执行以下命令:# -p: 指定生成的包名 # -d: 指定代码存放的目录 # -keep: 保留生成的源文件 wsimport -p com.example.weather.client -d src/main/java -keep http://ws.webxml.com.cn/WebServices/WeatherWS.asmx?wsdl
执行后,会在
com.example.weather.client包下生成一堆 Java 类(如WeatherWSSoap,getWeather等)。 -
在 Java 代码中调用
package com.example.weather.client;
public class WeatherClient {
    public static void main(String[] args) {
        // 1. 创建服务视图 (Service)
        // 参数是 wsdl 中定义的 <service name="...">
        WeatherWS service = new WeatherWS();
        // 2. 获取服务端点 (Port)
        // 参数是 wsdl 中定义的 <port name="..." binding="...">
        WeatherWSSoap port = service.getWeatherWSSoap();
        // 3. 调用具体的方法
        // 参数是 WSDL 中定义的请求参数
        String[] result = port.getWeather("北京", "");
        // 4. 处理结果
        if (result != null) {
            for (String s : result) {
                System.out.println(s);
            }
        } else {
            System.out.println("查询失败");
        }
    }
}
优点:
- 代码类型安全,有 IDE 支持(代码提示、重构)。
- 直接调用方法,感觉像调用本地方法一样。
缺点:
- 需要一个额外的代码生成步骤。
- 生成的代码可能很复杂,难以维护。
2 客户端调用方式二:动态调用 Dispatch API
如果你不想生成代码,或者 WSDL 文件不可用,可以使用 Dispatch API 进行动态调用。
import javax.xml.namespace.QName;
import javax.xml.soap.MessageFactory;
import javax.xml.soap.SOAPBody;
import javax.xml.soap.SOAPEnvelope;
import javax.xml.soap.SOAPMessage;
import javax.xml.ws.Dispatch;
import javax.xml.ws.Service;
import java.net.URL;
public class DynamicWeatherClient {
    public static void main(String[] args) throws Exception {
        // 1. 创建 Service 实例
        URL wsdlUrl = new URL("http://ws.webxml.com.cn/WebServices/WeatherWS.asmx?wsdl");
        QName qname = new QName("http://WebXml.com.cn/", "WeatherWS");
        Service service = Service.create(wsdlUrl, qname);
        // 2. 创建 Dispatch 实例,指定使用 SOAP 消息模式
        Dispatch<SOAPMessage> dispatch = service.createDispatch(
                new QName("http://WebXml.com.cn/", "WeatherWSSoap"),
                SOAPMessage.class,
                Service.Mode.MESSAGE);
        // 3. 创建并构造 SOAP 请求消息
        MessageFactory mf = MessageFactory.newInstance();
        SOAPMessage request = mf.createMessage();
        SOAPEnvelope envelope = request.getSOAPPart().getEnvelope();
        SOAPBody body = envelope.getBody();
        // 添加 SOAP Body 内容
        // 注意:这里的命名空间和元素名需要严格遵循 WSDL 定义
        QName bodyQName = new QName("http://WebXml.com.cn/", "getWeather");
        body.addBodyElement(bodyQName)
             .addAttribute(new QName("xmlns"), "http://WebXml.com.cn/")
             .addAttribute(new QName("cityName"), "北京");
        // 4. 发送请求并接收响应
        SOAPMessage response = dispatch.invoke(request);
        // 5. 处理响应
        response.writeTo(System.out);
    }
}
3 服务端发布方式:使用 Endpoint 类
如果你想快速发布一个简单的 SOAP 服务,可以使用 JAX-WS 提供的 Endpoint 类。
import javax.jws.WebService;
import javax.xml.ws.Endpoint;
// 1. 定义一个服务接口 (可选,但推荐)
@WebService
public interface HelloWorld {
    String sayHello(String name);
}
// 2. 实现服务接口
@WebService(endpointInterface = "com.example.HelloWorld")
public class HelloWorldImpl implements HelloWorld {
    @Override
    public String sayHello(String name) {
        return "Hello, " + name + "!";
    }
}
// 3. 发布服务
public class Publisher {
    public static void main(String[] args) {
        String address = "http://localhost:8080/hello";
        HelloWorldImpl helloWorld = new HelloWorldImpl();
        Endpoint.publish(address, helloWorld);
        System.out.println("Service published at: " + address);
    }
}
启动 Publisher 类后,你就可以通过地址 http://localhost:8080/hello?wsdl 访问 WSDL 文件了。
方法二:使用 Apache CXF
Apache CXF 是一个功能强大的开源框架,用于构建和开发 WebService,它支持 SOAP 和 REST,并且与 Spring 框架集成得非常好。
优点:
- 功能强大,支持 WS-* 标准(如 WS-Security, WS-Addressing)。
- 与 Spring 无缝集成,配置灵活。
- 性能优于纯 JAX-WS 实现。
1 生成客户端 (与 JAX-WS 类似)
CXF 提供了 cxf-codegen-plugin Maven 插件,功能与 wsimport 类似。
<!-- pom.xml -->
<plugin>
    <groupId>org.apache.cxf</groupId>
    <artifactId>cxf-codegen-plugin</artifactId>
    <version>3.4.5</version> <!-- 使用合适的版本 -->
    <executions>
        <execution>
            <id>generate-sources</id>
            <phase>generate-sources</phase>
            <configuration>
                <sourceRoot>${project.build.directory}/generated/cxf</sourceRoot>
                <wsdlOptions>
                    <wsdlOption>
                        <wsdl>http://ws.webxml.com.cn/WebServices/WeatherWS.asmx?wsdl</wsdl>
                    </wsdlOption>
                </wsdlOptions>
            </configuration>
            <goals>
                <goal>wsdl2java</goal>
            </goals>
        </execution>
    </executions>
</plugin>
执行 mvn generate-sources 后,代码会生成到 target/generated/cxf 目录下,后续调用方式与 JAX-WS 生成的代码完全一样。
2 使用 Spring 集成 CXF (服务端)
这是 CXF 最常用的方式,通过 Spring 来管理 Bean 和发布服务。
-
添加依赖
<!-- pom.xml --> <dependencies> <!-- Spring Context --> <dependency> <groupId>org.springframework</groupId> <artifactId>spring-context</artifactId> <version>5.3.23</version> </dependency> <!-- CXF Core --> <dependency> <groupId>org.apache.cxf</groupId> <artifactId>cxf-core</artifactId> <version>3.4.5</version> </dependency> <!-- CXF JAX-RS & JAX-WS --> <dependency> <groupId>org.apache.cxf</groupId> <artifactId>cxf-rt-frontend-jaxws</artifactId> <version>3.4.5</version> </dependency> <dependency> <groupId>org.apache.cxf</groupId> <artifactId>cxf-rt-transports-http</artifactId> <version>3.4.5</version> </dependency> <!-- CXF Spring Integration --> <dependency> <groupId>org.apache.cxf</groupId> <artifactId>cxf-spring-boot-starter-jaxws</artifactId> <version>3.4.5</version> </dependency> </dependencies> -
配置 Spring XML (
cxf-servlet.xml)<!-- src/main/resources/cxf-servlet.xml --> <beans xmlns="http://www.springframework.org/schema/beans" xmlns:xsi="http://www.w3.org/2001/XMLSchema-instance" xmlns:jaxws="http://cxf.apache.org/jaxws" xsi:schemaLocation=" http://www.springframework.org/schema/beans http://www.springframework.org/schema/beans/spring-beans.xsd http://cxf.apache.org/jaxws http://cxf.apache.org/schemas/jaxws.xsd"> <!-- 1. 定义你的服务实现 Bean --> <bean id="helloWorldImpl" class="com.example.HelloWorldImpl"/> <!-- 2. 使用 JAX-WS 发布服务 --> <jaxws:endpoint id="helloWorld" implementor="#helloWorldImpl" address="/hello"/> </beans> -
配置
web.xml<!-- web.xml --> <servlet> <servlet-name>CXFServlet</servlet-name> <servlet-class>org.apache.cxf.transport.servlet.CXFServlet</servlet-class> </servlet> <servlet-mapping> <servlet-name>CXFServlet</servlet-name> <url-pattern>/ws/*</url-pattern> </servlet-mapping>服务地址为:
http://localhost:8080/your-app-context/ws/hello
方法三:使用 Spring Boot Starter 简化开发
Spring Boot 极大地简化了 WebService 的开发和部署。
1 添加依赖
对于 SOAP (JAX-WS):
<!-- pom.xml -->
<dependency>
    <groupId>org.springframework.boot</groupId>
    <artifactId>spring-boot-starter-web-services</artifactId>
</dependency>
<!-- CXF 提供了对 JAX-WS 的更好支持 -->
<dependency>
    <groupId>org.apache.cxf</groupId>
    <artifactId>cxf-spring-boot-starter-jaxws</artifactId>
    <version>3.4.5</version>
</dependency>
对于 REST (Spring MVC):
<!-- pom.xml -->
<dependency>
    <groupId>org.springframework.boot</groupId>
    <artifactId>spring-boot-starter-web</artifactId>
</dependency>
2 配置和调用 (SOAP)
-
服务实现
@WebService(serviceName = "HelloWorld", targetNamespace = "http://example.com/", endpointInterface = "com.example.HelloWorld") @Component public class HelloWorldImpl implements HelloWorld { @Override public String sayHello(String name) { return "Hello from Spring Boot, " + name + "!"; } } -
配置类
@Configuration
public class CxfConfig {
    @Bean
    public ServletRegistrationBean<CXFServlet> cxfServlet() {
        return new ServletRegistrationBean<>(new CXFServlet(), "/ws/*");
    }
    @Bean(name = Bus.DEFAULT_BUS_ID)
    public SpringBus springBus() {
        return new SpringBus();
    }
    @Bean
    public Endpoint endpoint() {
        EndpointImpl endpoint = new EndpointImpl(springBus(), new HelloWorldImpl());
        endpoint.publish("/hello");
        return endpoint;
    }
}
服务地址:
http://localhost:8080/ws/hello
方法四:访问 RESTful WebService (基于 HTTP/JSON)
现代 WebService 更多的是 RESTful 风格,Spring Boot 提供了非常便捷的工具。
1 使用 RestTemplate (Spring 传统方式)
RestTemplate 是一个同步的 HTTP 客户端,在 Spring 5 之前是标准。
-
配置
RestTemplateBean@Configuration public class RestTemplateConfig { @Bean public RestTemplate restTemplate() { return new RestTemplate(); } } -
创建 DTO (Data Transfer Object)
// 假设 API 返回 {"userId": 1, "id": 1, "title": "...", "completed": false} public class Todo { private int userId; private int id; private String title; private boolean completed; // Getters and Setters... } -
在 Service 中调用
@Service
public class TodoService {
    @Autowired
    private RestTemplate restTemplate;
    private static final String TODO_URL = "https://jsonplaceholder.typicode.com/todos/1";
    public Todo getTodoById(int id) {
        // 使用 getForObject,直接将 JSON 映射到 Todo 对象
        return restTemplate.getForObject(TODO_URL + "/" + id, Todo.class);
    }
}
2 使用 WebClient (Spring Reactive/推荐方式)
WebClient 是 Spring 5 引入的、非阻塞的、响应式的 HTTP 客户端,是 RestTemplate 的现代替代品。
-
配置
WebClientBean@Configuration public class WebClientConfig { @Bean public WebClient webClient() { return WebClient.create(); } } -
在 Service 中调用
@Service
public class TodoServiceWebClient {
    @Autowired
    private WebClient webClient;
    private static final String TODO_URL = "https://jsonplaceholder.typicode.com/todos";
    public Mono<Todo> getTodoByIdReactive(int id) {
        // 返回一个 Mono,代表一个异步的、可能包含 0-1 个值的流
        return webClient.get()
                .uri(TODO_URL + "/{id}", id)
                .retrieve() // 发出请求并获取响应
                .bodyToMono(Todo.class); // 将响应体反序列化为 Todo 对象
    }
    // 同步调用方式
    public Todo getTodoByIdSync(int id) {
        return getTodoByIdReactive(id).block(); // block() 会阻塞线程,直到结果返回
    }
}
WebClient 的优势:
- 非阻塞:在高并发场景下,能以更少的线程处理更多的请求,性能更高。
- 响应式编程:与 Project Reactor 和 RxJava 等库无缝集成,适合构建异步、事件驱动的应用。
总结与对比
| 方法 | 协议 | 优点 | 缺点 | 适用场景 |
|---|---|---|---|---|
JAX-WS (wsimport) |
SOAP | 类型安全,IDE 友好 | 需要代码生成,代码臃肿 | 传统企业应用,与遗留系统集成 |
JAX-WS (Dispatch) |
SOAP | 动态灵活,无需代码 | 编码复杂,容易出错 | WSDL 动态变化,或无法预知服务接口时 |
| Apache CXF | SOAP/REST | 功能强大,支持标准多,Spring 集成好 | 学习曲线稍陡 | 企业级应用,需要高级 WS-* 特性的项目 |
| Spring Boot (SOAP) | SOAP | 配置简单,快速启动 | 对复杂 SOAP 支持可能不如 CXF | 新的 Spring Boot 微服务项目,需要 SOAP 时 |
RestTemplate |
REST | 简单易用,同步模型 | 阻塞式,性能有限 | 简单的 REST 客户端调用,或旧项目维护 |
WebClient |
REST | 非阻塞,高性能,响应式 | 异步编程模型需要适应 | 新项目,特别是高并发、微服务架构 |
如何选择?
- 必须对接一个传统的 SOAP 服务?
- 如果只是客户端调用,优先考虑 JAX-WS
wsimport,因为它最简单直接。 - 如果服务端需要发布或需要更复杂的功能,选择 Apache CXF 或 Spring Boot + CXF。
- 如果只是客户端调用,优先考虑 JAX-WS
- 开发一个新的、现代化的服务?
- 首选 RESTful 风格。
- 在 Spring 生态中,
WebClient是未来的趋势,特别是对于构建高性能的系统。RestTemplate虽然仍然可用,但已被标记为不推荐在新项目中使用。 - 如果项目不是基于 Spring,可以使用其他库如 OkHttp、Apache HttpClient 来调用 REST API。
希望这份详细的指南能帮助你理解在 Java 中访问 WebService 的各种方法!