Of course! "Java Web Eclipse" is a classic combination for learning and building web applications. Let's break it down into what each part is, how they work together, and a step-by-step guide to get you started.

The Three Components Explained
Java (The Language & Platform)
- What it is: Java is a robust, object-oriented programming language. It's platform-independent, meaning "write once, run anywhere" (WORA).
- In Web Development: You use Java to write the "backend" logic of your web application. This includes:
- Handling user requests (e.g., when a user clicks a "Login" button).
- Processing data (e.g., validating user input, performing calculations).
- Interacting with a database (e.g., storing or retrieving user information).
- Generating the HTML that is sent to the user's browser.
Web (The Application Type)
- What it is: A "web application" is an application that runs on a web server and is accessed through a web browser (like Chrome, Firefox, or Edge).
- Key Technologies: Java web development relies on several core technologies:
- Servlets: The fundamental building blocks. A servlet is a Java class that can handle HTTP requests and responses. It's the entry point for any request to your server.
- JSP (JavaServer Pages): A technology that allows you to embed Java code directly into HTML pages. It's used to create the dynamic, data-driven views of your application.
- JDBC (Java Database Connectivity): An API that allows Java applications to connect to and interact with databases (like MySQL, PostgreSQL, Oracle).
- (Modern Frameworks): While you can start with basic Servlets and JSP, modern Java web development is dominated by powerful frameworks that simplify and organize the code:
- Spring Boot: (Highly Recommended for beginners) Makes it incredibly easy to create stand-alone, production-grade Spring-based applications with minimal configuration.
- Jakarta EE (formerly Java EE): A comprehensive set of specifications for building enterprise-grade applications. It includes APIs for everything from web services to messaging.
Eclipse (The Integrated Development Environment - IDE)
- What it is: Eclipse is a free, open-source, and highly popular IDE for Java (and other languages). An IDE is a software application that provides comprehensive facilities to computer programmers for software development.
- Why it's used for Java Web:
- Code Editor: Intelligent code completion, syntax highlighting, and error checking.
- Compiler & Debugger: Built-in tools to compile your code and find and fix bugs.
- Project Management: Helps you organize your files, libraries (JARs), and project structure.
- Server Integration: You can configure and run web servers (like Apache Tomcat) directly from within Eclipse.
- Plugins: You can extend Eclipse's functionality with plugins, such as those for Spring Boot, database tools, and more.
How They Work Together: A Simple Flow
Here's a typical request-response cycle in a Java web application developed with Eclipse:
- User Action: A user types a URL (
http://myapp.com/login) into their browser and hits Enter. - Server Request: The browser sends an HTTP
GETrequest to your web server (e.g., Apache Tomcat). - Servlet Handling: The server receives the request and passes it to the appropriate Java Servlet (e.g., a
LoginServlet). - Java Logic: The
LoginServletexecutes its Java code. This might involve:- Reading parameters from the request (e.g., username and password).
- Using JDBC to query a database to check if the credentials are valid.
- Generate Response:
- Based on the logic, the servlet decides what to send back.
- It might forward the request to a JSP page.
- The JSP page generates the final HTML, perhaps displaying a "Welcome, [Username]!" message.
- Browser Display: The server sends the generated HTML back to the user's browser, which then renders the page for the user to see.
Step-by-Step Guide: Setting Up Your First Project
Let's create a simple "Hello, World" web project in Eclipse.
Prerequisites
- Java Development Kit (JDK): You need the JDK to compile Java code.
- Download from Oracle's website or use an open-source build tool like Maven or Gradle, which manage this for you.
- Eclipse IDE for Enterprise Java and Web Developers:
- Download from the Eclipse downloads page. This specific package includes the tools needed for web development (like a server runtime).
- A Web Server (Runtime Environment): The most common one is Apache Tomcat.
- Download the latest version from the Tomcat website (e.g., "Core: zip" or "Core: tar.gz").
Installation
- Install JDK: Follow the installer instructions for your OS. Make sure you know the installation path.
- Install Eclipse: Unzip the downloaded Eclipse file into a folder (e.g.,
C:\eclipseor/Users/yourname/eclipse). - Install Tomcat: Unzip the Tomcat file into a folder (e.g.,
C:\apache-tomcat-9.0.xor/Users/yourname/apache-tomcat-9.0.x).
Setup in Eclipse
-
Point Eclipse to your JDK:
- Go to
Window->Preferences->Java->Installed JREs. - Click
Add..., selectStandard VM, and browse to the JDK installation directory you noted earlier. - Ensure the new JRE is checked and click
Apply and Close.
- Go to
-
Configure the Tomcat Server:
 (图片来源网络,侵删)
- Go to
Window->Preferences->Server->Runtime Environments. - Click
Add..., select your version of Apache Tomcat v9.x (or the one you downloaded), and clickNext. - Browse to the Tomcat installation directory you unzipped earlier.
- Click
Finish. You should now see your Tomcat server in the list.
- Go to
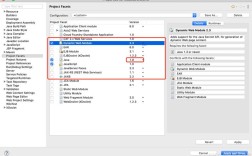
Create a Dynamic Web Project
- Go to
File->New->Dynamic Web Project. - Project Name: Enter
HelloWeb. - Target runtime: Click
New..., select the Apache Tomcat server you just configured, and clickFinish. - Configuration: You can leave this as the default "Dynamic web module version 5.0".
- Click
Finish.
Eclipse will create a project structure for you. You will see:
src: Source code for your Java classes (like Servlets).WebContent: This is the root of your web application. It contains:index.html: A default welcome page.WEB-INF: A special directory.web.xml: The Deployment Descriptor. This is an XML file that describes your web application to the server, including which URL maps to which servlet. (Modern frameworks like Spring Boot often replace this with annotations).
Create and Run a Simple Servlet
-
Create a Servlet Class:
- Right-click on the
srcfolder ->New->Servlet. - Package:
com.example.hello - Class name:
HelloServlet - Click
Finish.
- Right-click on the
-
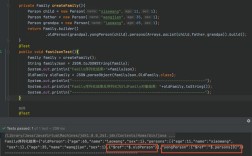
Edit the Servlet Code: Eclipse will generate a template. Modify the
doGetmethod to look like this:package com.example.hello; import java.io.IOException; import java.io.PrintWriter; import jakarta.servlet.ServletException; import jakarta.servlet.annotation.WebServlet; import jakarta.servlet.http.HttpServlet; import jakarta.servlet.http.HttpServletRequest; import jakarta.servlet.http.HttpServletResponse; @WebServlet("/hello") // This annotation maps the servlet to the URL "/hello" public class HelloServlet extends HttpServlet { private static final long serialVersionUID = 1L; protected void doGet(HttpServletRequest request, HttpServletResponse response) throws ServletException, IOException { // Set the content type of the response response.setContentType("text/html"); // Get a PrintWriter to write the response PrintWriter out = response.getWriter(); // Write HTML content to the response out.println("<html>"); out.println("<head><title>Hello Servlet</title></head>"); out.println("<body>"); out.println("<h1>Hello from Java Web in Eclipse!</h1>"); out.println("</body>"); out.println("</html>"); } }- Note: We are using
@WebServlet("/hello"). This is a modern annotation that tells the server that this servlet should handle requests for the/helloURL. This is simpler than configuring it inweb.xml.
- Note: We are using
-
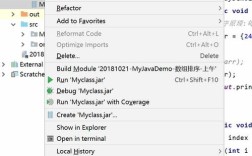
Run the Application:
 (图片来源网络,侵删)
- Right-click on the
HelloWebproject in the "Project Explorer". - Go to
Run As->Run on Server. - Select the configured Tomcat server and click
Finish.
- Right-click on the
-
View the Result:
- Eclipse will start the Tomcat server and open a web browser.
- By default, it might go to
http://localhost:8080/HelloWeb/. To see your servlet, navigate to:http://localhost:8080/HelloWeb/hello
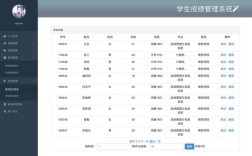
You should see a page with the heading "Hello from Java Web in Eclipse!".
Modern Approach: Spring Boot with Eclipse
While the above method is great for understanding the fundamentals, modern development uses Spring Boot.
-
Why Spring Boot?
- Convention over Configuration: It automatically configures things for you, so you don't have to write verbose XML files.
- Embedded Server: You don't need to separately download and configure Tomcat. Spring Boot includes it automatically.
- Starter Dependencies: It provides simple "starter" dependencies (e.g.,
spring-boot-starter-web) that pull in all the necessary libraries for a specific feature.
-
How to set up a Spring Boot project in Eclipse:
- Use Spring Initializr: Go to start.spring.io.
- Select Maven or Gradle as your project.
- Choose your Java version.
- For Project Metadata, give it a Group (e.g.,
com.example) and an Artifact (e.g.,demo). - Add Dependencies:
- Spring Web: This will give you everything you need to build a web application, including an embedded Tomcat server.
- Click GENERATE. This will download a
.zipfile. - Import the project into Eclipse:
- Go to
File->Import->Existing Maven Projects. - Browse to the location where you unzipped the downloaded file and click
Finish.
- Go to
Eclipse will import the project and download all the necessary dependencies. You can then create a simple controller class to run your application.
Example Spring Boot Controller (src/main/java/com/example/demo/DemoApplication.java):
package com.example.demo;
import org.springframework.boot.SpringApplication;
import org.springframework.boot.autoconfigure.SpringBootApplication;
import org.springframework.web.bind.annotation.GetMapping;
import org.springframework.web.bind.annotation.RestController;
@SpringBootApplication
public class DemoApplication {
    public static void main(String[] args) {
        SpringApplication.run(DemoApplication.class, args);
    }
}
// A simple REST controller
@RestController
class HelloController {
    @GetMapping("/hello-spring")
    public String sayHello() {
        return "Hello from Spring Boot!";
    }
}
To run this, simply right-click on the DemoApplication.java file and select Run As -> Java Application. The server will start, and you can access http://localhost:8080/hello-spring in your browser.
Summary
| Feature | Classic Servlet/JSP | Modern Spring Boot |
|---|---|---|
| Setup | Manual setup of server and project structure. | Highly automated via Spring Initializr. |
| Configuration | XML files (web.xml) and manual dependency management. |
Annotations and "starter" dependencies. Minimal configuration. |
| Server | Requires a separate, external server (e.g., Tomcat). | Includes an embedded server (Tomcat by default). |
| Learning Curve | Good for understanding the fundamentals of Java EE. | Steeper initial learning curve for the framework, but much faster for building apps. |
| Best for | Learning, legacy systems, small projects. | Almost all new Java web projects. |
For a beginner, I recommend starting with the Servlet/JSP approach to understand the core concepts, then quickly moving to Spring Boot to build modern, efficient applications. Eclipse is an excellent choice for both paths.